This module implements the rdk:component:camera API in a viam:camera:realsense model.
Configure this model on your machine to stream image and depth data from the Intel RealSense family of cameras to Viam.
Navigate to the CONFIGURE tab of your machine in the Viam app.
Add camera / realsense to your machine.
Note
For more information, see Configure a Machine.
- On the CONFIGURE tab, add the ** discovery / realsense:discovery ** service.
- Save your configuration.
- Click on the TEST panel for your discovery service. You should now see possible configurations.
- Click Add component next to the configuration for your camera.
Copy and paste the following attributes into your camera's JSON configuration:
{
  "sensors": ["color", "depth"],
  "width_px": 640,
  "height_px": 480,
  "serial_number": ""
}
Edit the attributes as applicable.
The following attributes are available for viam:camera:realsense cameras:
| Name | Type | Inclusion | Description |
|---|---|---|---|
sensors |
list | Optional | The RealSense data streams you want your robot to sense from. A list that contain the strings color and/or depth. The sensor that comes first in the list is designated the "main sensor", and is the image that gets returned by get_image calls and appears in the CONTROL tab on the Viam app. If you would like a list of images from all listed sensors simultaneously, use GetImages. |
width_px |
int | Optional | The width of the output images in pixels. If the RealSense cannot produce the requested resolution, the component will fail to be built. |
height_px |
int | Optional | The height of the output images in pixels. If the RealSense cannot produce the requested resolution, the component will fail to be built. |
serial_number |
string | Optional | The serial number of the specific RealSense camera to use. To find your camera's serial number, the serial number of each plugged-in and available RealSense camera will be logged on module startup. You can also find device information using the RealSense SDK directly. If this field is omitted or is an empty string, the module will use the first RealSense camera it detects. |
{
  "components": [
    {
      "name": "myRealSense",
      "attributes": {
        "sensors": ["color","depth"],
        "width_px": 640,
        "height_px": 480,
        "serial_number": "YOUR_CAMERA_SERIAL_NUMBER"
      },
      "namespace": "rdk",
      "type": "camera",
      "model": "viam:camera:realsense"
    }
  ]
}
Before testing the module, make sure that your machine is connected to the Viam app, displaying as Live in the part status dropdown in the top right corner of the machine's page.
Once the realsense model is configured on your machine, you can access the depth and color data the camera streams through the Viam camera API.
The following methods of the Viam camera API are supported:
GetPointCloud: returns depth data and can return color data depending on the provided imageGetImages: returns image data from configured sensors, filterable via source names (see below)GetProperties: returns intrinsic properties of a camera
GetImages accepts an optional filter_source_names parameter to select which image sources to return. The valid source names are:
| Source name | Description |
|---|---|
color |
RGB color image, encoded as JPEG |
depth |
Depth map, encoded as raw depth bytes (big-endian by default, little-endian if little_endian_depth is true) |
A source is only returned if it is both listed in the sensors attribute of the camera's configuration and included in filter_source_names (or filter_source_names is empty). For example:
sensors: ["color", "depth"]with emptyfilter_source_namesreturns bothcoloranddepth.sensors: ["color", "depth"]withfilter_source_names: ["depth"]returns onlydepth.sensors: ["color"]with emptyfilter_source_namesreturns onlycolor, sincedepthis not configured.sensors: ["color"]withfilter_source_names: ["depth"]returns nothing, sincedepthis not insensors.
You can view the data your camera streams live on the CONTROL tab of the Viam app. For more information, see Control Machines.
The RealSense module supports updating camera firmware through the do_command API. This allows you to:
- Install bug fixes and performance improvements
- Ensure consistent firmware versions across multiple devices
- Recover from firmware issues
Note
Firmware update is currently supported on Linux only. macOS support is not yet available.
Warning
DO NOT DISCONNECT THE CAMERA DURING A FIRMWARE UPDATE! Interrupting the update process can brick your device.
Use the do_command method with the following command structure:
Option 1: Auto-detect recommended firmware (recommended)
{
  "update_firmware": ""
}
Setting update_firmware to an empty string will automatically detect your camera's current firmware version and install the recommended update if available.
Option 2: Specify firmware URL
{
  "update_firmware": "https://realsenseai.com/wp-content/uploads/2025/07/d400_series_production_fw_5_17_0_10.zip"
}
You can specify a direct URL to a firmware .zip file containing the firmware binary.
Tip
Find firmware download URLs for D400 series cameras at RealSense D400 Firmware Releases
The following firmware versions are supported for auto-detect mode:
| Version | Device Series | URL |
|---|---|---|
| 5.17.0.10 | D400 Series | Download |
from viam.components.camera import Camera

# Get the camera component
camera = Camera.from_robot(robot, "myRealSense")

# Option 1: Auto-detect and install recommended firmware
result = await camera.do_command({"update_firmware": ""})

# Option 2: Install specific firmware from URL
result = await camera.do_command({
    "update_firmware": "https://realsenseai.com/wp-content/uploads/2025/07/d400_series_production_fw_5_17_0_10.zip"
})⚠️ DO NOT DISCONNECT: Never disconnect the camera during a firmware update. This can permanently damage the device.- Firmware format: Only
.zipfiles containing firmware binaries are supported. - Single camera updates: Only update one camera at a time. If you have multiple RealSense cameras, perform updates sequentially.
- Update process: The camera will enter DFU (Device Firmware Update) mode during the update. This is normal and may take several minutes to complete.
- Camera unavailable during update: The camera will not be available for streaming during the firmware update process.
- Recovery mode support: The Discovery service automatically detects cameras in recovery/DFU mode and creates them as separate camera components with a
-recoverysuffix. To update a recovery device, you must provide an explicit firmware URL (auto-detect is not supported for recovery devices). - One-time operation: The firmware update is a one-time operation. Once complete, the camera will automatically reboot with the new firmware.
- Check your current firmware version by viewing the module logs on startup
- Ensure the camera is securely connected and will not be disconnected during the update
- Call
do_commandwith theupdate_firmwareparameter - Monitor the module logs to track update progress
- Wait for the update to complete (typically 2-5 minutes)
- The camera will automatically reboot and be ready to use with the new firmware
If a firmware update is interrupted (power loss, disconnection, etc.), your camera may be stuck in recovery/DFU mode. You'll see these symptoms:
- Camera cannot stream images
- Module logs show:
Device at index X is in recovery/DFU mode with update ID: XXXXXXXXX GetImagesreturns error: "Camera is in recovery/DFU mode and cannot stream images"
Option 1: Retry on the Same Camera (Recommended)
This is the easiest recovery method:
- The camera automatically detects it's in recovery mode
- Get the appropriate firmware URL for your camera from RealSense D400 Firmware Releases
- Run the firmware update command again on the same camera with the explicit firmware URL:
{ "update_firmware": "https://example.com/your-firmware-version.zip" } - Wait for the update to complete (100% progress)
- The camera will automatically reboot and return to normal operation
Note
Auto-detect mode ("update_firmware": "") does not work for recovery devices. You must provide an explicit firmware URL.
Find firmware URLs at RealSense D400 Firmware Releases
Option 2: Use Discovery Service (For Edge Cases)
If Option 1 doesn't work (e.g., brand new device in DFU mode, unknown device, multiple cameras and unsure which is stuck):
- Use Discovery service to find the recovery device
- It will appear as
realsense-XXXXXXXXX-recovery(with-recoverysuffix) - Note:
XXXXXXXXXis the firmware update ID, not the serial number
- It will appear as
- Add the recovery device to your robot configuration
- Get the appropriate firmware URL for your camera from RealSense D400 Firmware Releases
- Run the firmware update command on the recovery device with the explicit firmware URL:
{ "update_firmware": "https://example.com/your-firmware-version.zip" } - Wait for the update to complete (100% progress)
- The original camera will reboot and return to normal operation
- Remove the recovery device from your configuration
If the firmware update progress stops for more than 2 minutes:
- DO NOT disconnect the camera - wait at least 5 minutes
- Check the module logs for error messages
- If the module crashes during update or the update process is abruptly interrupted for any other reason:
- The camera will remain in recovery mode
- Follow the steps in the "Camera Stuck in Recovery/DFU Mode" section
These errors typically occur when:
- The camera is transitioning between modes (normal ↔ DFU)
- Multiple processes are trying to access the camera
- The camera needs time to enumerate after plugging in
Solution:
- Wait 10-15 seconds for the camera to fully enumerate
- Ensure only the Viam module is accessing the camera (close RealSense Viewer, other apps)
- Try unplugging the camera for 5 seconds, then plug it back in
- Restart the Viam module if issues persist
Firmware downloads require internet connectivity. If downloads fail:
- Verify your machine can access the internet
- Check firewall settings allow HTTPS traffic
- Try downloading the firmware manually first to test connectivity:
curl -O https://realsenseai.com/wp-content/uploads/2025/07/d400_series_production_fw_5_17_0_10.zip
If automatic recovery fails, you can manually recover using Intel's tools, more info here
- USB Quality: Use a high-quality USB 3.0 cable directly to a USB 3.0 port (avoid hubs)
- Power Supply: Ensure adequate power supply, especially on Raspberry Pi
- One at a time: Only update one camera at a time if you have multiple devices
- Check logs: Module logs provide detailed progress and error information
- Verify device name: A camera in recovery mode will appear with a
-recoverysuffix in its name
If you are using a Linux machine, and do not want to use the Viam registry, you can download the module code from the registry and use it directly on your machine. Note that as of version 0.16.0-rc3, the module is no longer distributed as an AppImage.
Follow the instructions to add a local module just as you would for testing.
Provide an Executable path of /usr/local/bin/viam-camera-realsense when adding the module.
Or, if you aren't using the Viam app to manage your machine's configuration, modify your machine's JSON file as follows to add the realsense module to your machine:
  "modules": [
    {
      "type": "local",
      "name": "intel",
      "executable_path": "/usr/local/bin/viam-camera-realsense"
    }
  ],
Support for specific hardware is known for the following devices. The table is not complete and subject to change.
| Devices | D415 | D435 | D435i | D455 |
|---|---|---|---|---|
| RPi 4B/5 Trixie | X | X | ||
| RPi 4B/5 Bookworm | X | X | ||
| RPi 4B Bullseye | X | |||
| Orin Nano JetPack 5.1 | X | X | X | |
| UP 4000 | X | |||
| macOS | (1) |
(1) macOS support is experimental and based on v2.57.6 (Beta) from RealSense. May have stability issues. Firmware updates are not supported on macOS.
This module depends on the librealsense SDK. As of the time of writing, Ubuntu is the only Linux Distro librealsense officially supports. The module works on our hardware setups using Bullseye on RPI4, and some setups on Bookworm. However, we recommend adhering to the requirements of the SDK dependency and to use Ubuntu when possible to avoid instability and unexpected behavior.
If you get an error like "failed to set power state", or "Permission denied", you may need to install the udev rules for when the USB plugs in.
wget https://raw.githubusercontent.com/IntelRealSense/librealsense/7a7c2bcfbc03d45154ad63fa76b221b2bb9d228f/config/99-realsense-libusb.rules
sudo cp 99-realsense-libusb.rules /etc/udev/rules.d/
sudo udevadm control --reload-rules
sudo udevadm trigger
You can also look at the official RealSense troubleshooting guide here.
The module takes advantage of faster USB ports. Use the (blue) USB 3.0 port on the Raspberry Pi for faster streaming and access to more resolution options.
macOS support is based on v2.57.6 (Beta) from RealSense, and may have stability issues given its beta state.
Note: Firmware updates are not currently supported on macOS.
If you see errors like [serve] Realsense module is not running as root:
- You must stop the viam-server service with ctrl-C on the terminal where it is running
- Then run it as root with
sudo viam-server -config <path-to-viam-config>.json
make setup
make module.tar.gz
make test
make clean
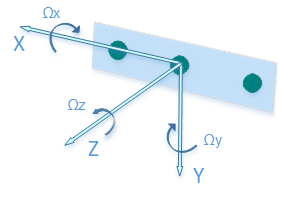
It is important to consider that the coordinate system of the camera might not match the coordinate system of the component it is mounted on. Let us consider the scenario where the camera is mounted on a base, such that the camera faces the forward direction of movement of the base. Let the base's forward direction be the +Y axis. Following the right hand rule, the +X axis points right, and so the +Z axis of the base points up. For the intel realsense camera the +Z axis points out of the camera lens, the +X axis points to the right, and the +Y axis points down. To properly configure these components in the frame system we say that the camera's parent is the base. We say that the orientation of the camera in Viam's Orientation Vector Degrees is OX:0, OY:1, OZ:0, Theta:-90. It is important to note that the base itself must also be in the frame system, the base would have parent as world with the default Viam Orientation Vector Degrees values, i.e. OX:0, OY:0, OZ:1, Theta:0.
For the Z offset between the exterior of the camera and the point where depth = 0, find the depth start point (ground zero reference) in the manufacturer data sheet.
Below is an image of the intel realsense's coordinate system.