This repo isn't meant to be used by other people. It's just for me to use while letting others "peer over my shoulder" to see how I have things configured.
This is how I get my dotfiles installed in a new /home/am directory,
aka $HOME. I start with cloning this repo:
git init .
git remote add -t \* -f origin git@github.com:amontalenti/home.git
git checkout master
I may hit conflicts with the existing .bashrc or .profile. Just move those to another directory and let it run.
Once I clone the repo, I'll need to restart the shell. If I'm logged in to a fresh Linux box (e.g. Ubuntu or similar) via ssh, the simplest way to do this is to log off and log back on.
On a freshly bootstrapped Ubuntu machine, I can typically clone this git repo
and get going pretty quickly with bash. But, in my day-to-day development,
I use zsh. For years, I used bash only, and mostly out of habit. Nowadays,
I keep my bash environment around to give me the option to use bash for
shell script debugging.
I find it convenient to keep my "basic" .bashrc configuration around, and
then "layer" my zsh configuration over them. The bash config is
summarized here:
| file | description |
|---|---|
| ~/.bashrc | pulls everything together |
| ~/.bash_aliases | handy shortcuts |
| ~/.bash_env | sets up my environment the way I like |
| ~/.bash_functions | when an alias doesn't cut it |
You might wonder why it's handy to keep bash in a working state, and around. Two reasons. First, when you first clone this repo into a fresh Linux box, you'll find that bash is the default shell. It's therefore nice to have it working. Second, sometimes you are working on customizing your shell itself, and you break things. In these scenarios, it's handy to have another "working" shell laying around until you fix things. For me, bash and zsh play this role for one another.
I like to get bash up-and-running fully before zsh. Do this:
- Install
pyenv - Install
cargo - Install
nix-shell(experimental) - Install
uv(experimental) - Install
mise(experimental)
At this point, my bash should be fully functional. Then, to get zsh:
- Install
zsh - Install
oh-my-zsh - Layer my
oh-my-zshcustomizations over the fresh install - Install the "p10k" theme
- Install an extra
oh-my-zshplugin
We'll follow ALL these steps in turn.
We use pyenv to compile Python and manage Python environments, because some of
my helper scripts rely on Python and pyenv, and expect it. The one-liner
here should be:
curl https://pyenv.run | bash
To install rust and cargo, check out this page in the cargo book:
curl https://sh.rustup.rs -sSf | sh
To install nix-shell, check out this download info on the Nix website. If
it's a laptop, desktop, or server I fully control, I should do the multi-user
install:
sh <(curl -L https://nixos.org/nix/install) --daemon
After you install, you should activate the default nix profile for current user:
nix-env --switch-profile /nix/var/nix/profiles/default
Lately, I've been using uv as an alternative to pyenv and pip.
Install:
curl -LsSf https://astral.sh/uv/install.sh | sh
Read more about uv.
I've also been using mise as an alternative to nvm for managing my Node
installations. My plan is to start with mise replacing nvm, since
nvm is my least favorite language runtime version manager. And then I'll
see if I can get mise to replace other lesser-used runtimes for me, too,
such as for Go, Rust, Zig, Java, Ruby, etc. To install mise:
curl https://mise.run | sh
Then check out the mise Quick Start Guide.
Using zsh has become second nature to me, and has become as sturdy a tool
in my toolbox as vim. To install zsh, I rely on apt. So:
sudo apt install zsh
Because this git repo contributes a ~/.oh-my-zsh directory, you need to do
a little dance to setup oh-my-zsh. You need to temporarily move it aside,
then run the installer, and then rsync the contents of the original cloned
repo back into it. Then you can get rid of the backup. Try this:
mv ~/.oh-my-zsh ~/.oh-bck
sh -c "$(curl -fsSL https://raw.github.com/ohmyzsh/ohmyzsh/master/tools/install.sh)"
rsync -Pav ~/.oh-bck/ ~/.oh-my-zsh/
rm -Rf .oh-bck
You need to install the "p10k" theme via this recipe:
git clone --depth=1 https://github.com/romkatv/powerlevel10k.git ${ZSH_CUSTOM:-$HOME/.oh-my-zsh/custom}/themes/powerlevel10k
Similarly, you need to install zsh-better-npm-completion thusly:
git clone https://github.com/lukechilds/zsh-better-npm-completion ~/.oh-my-zsh/custom/plugins/zsh-better-npm-completion
Then, I'll try it out by running zsh before switching shell, by simply
running zsh.
If powerlevel10k didn't activate when running zsh, it's probably because
installing zsh blew away .zshrc from the git checkout. Fix it thusly:
git checkout .zshrc
Then restart zsh.
With zsh, I took a different approach than bash, but it's unified my bash
setup for common aliases and functions. I have a simple .zshrc that
implements the equivalent of .bash_env.
In bash, my prompt (PS1) is set entirely by the simple bash
environment, and is very basic, optimized for prompt render speed.
In zsh, things are a bit more "souped up", and I have two prompt themes
available:
powerlevel10k/powerlevel10kis the amazing p10k theme that leverages a pure zsh implementation of the fastest and most configurable prompt one could imagine.ampy, short for "Andrew Montalenti Python Prompt"; the prompt is implemented via an oh-my-zsh theme that outsources most of its work to a Python script calledzshprompt, which lives in~/opt/bin/
Thus, my "full" zsh environment is summarized in this table:
| file | description |
|---|---|
| ~/.zshrc | pulls everything together |
| ~/.../custom/themes/powerlevel10k | cloned submodule for powerlevel10k |
| ~/.p10k.zsh | zsh script for the powerlevel10k config |
| ~/.oh-my-zsh/themes/am.zsh-theme | alt theme that provides zshprompt calls |
| ~/opt/bin/zshprompt | Python script to generate prompt |
| ~/.bash_functions | I use these across zsh and bash |
| ~/.bash_aliases | I use these across zsh and bash |
The zshprompt script supports shortened paths, git branches, Python
virtualenvs, and last process exit code, and only when using the am zsh
theme. Here is what it looks like:
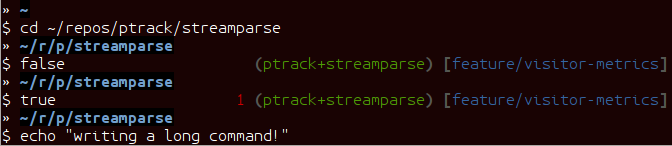
Here's the guide:
- path =
~/repos/ptrack/streamparse - virtualenv =
ptrack+streamparse - branch =
feature/visitor-metrics
The right prompt auto-hides when you are writing a long command, and the path
compresses uses a shortening approach (thus ~/r/p/streamparse). You can
also see the exit status of 1 in red of the false command.
As for "p10k", examples of that prompt are best covered at the p10k GitHub
page. I found that by customizing .p10k.zsh, I could reproduce all the
features of my zshprompt script, while also having nice support for things
that would be way harder to implement on my own. Also, p10k is super fast to
load through some zsh tricks, so as of the 2020s, it's my preferred shell.
I use vim for text editing. I tend to use vim for editing all sorts
of files, including:
- Python
- JavaScript
- Clojure
- Java
- C
- CSS, LESS, Sass
- HTML, JSON, XML
- reStructuredText
- Markdown
- bash, zsh
- Dockerfile
- configuration files
- Zig, Racket, Scheme, Go, Elixir (for fun)
My vim configuration is a bit customized, as I use vim as a kind of
full-blown and integrated Linux development environment.
However, I don't go overboard remapping keys. In general, I'm pretty happy with vim's default mappings and have learned to love them. Most of these customizations are just to make editing typical files for me nicer, and add file-specific or workflow-specific add-ons.
Some nice "IDE-like" plugins for me include:
- ctrlp, for quick file opening
- dockerfile, for docker support
- fugitive, for git integration
- goyo, for distraction-free writing
- gundo, for undo history
- nerdtree, for file navigation
- parinfer-rust, for speedy indent/dedent of Lisp code
- rainbow_parentheses, for matching parens, especially in Lisp
- repeat, just makes the
.command more flexible and scriptable - surround, adds a noun to vim for "surroundings", for quoting and parens
- syntastic, for syntax checking, mainly Python and JavaScript
- tagbar, for improved code outlines and module navigation
- vim-clojure-static, for Clojure basic editing support
- vim-elixir, for Elixir basic editing support
- vim-eslint-compiler, for ESLint
:makeand quickfix support - vim-fontsize, for adjusting font size quickly in
gvim - vim-fireplace, for Clojure interaction with
nrepl - vim-flake8, for Python syntax checking
- vim-go, for Go basic editing
- vim-jinja, for enhanced
jinjasyntax highlighting - vim-less, for editing
LESSCSS files - vim-livedown, for live browser preview of Markdown files
- vim-markdown, improved Markdown syntax handling
- vim-racket, for Racket and Scheme basic editing
- vim-ruff, for running Python ruff formatter
- vim-sexp, for Clojure S-expr support
- vim-sexp-ext, for Clojure text motions over S-expressions
- vim-superman: read
manpages within the editor - vim-virtualenv, for Python virtualenv support
- vim-yaml, basic YAML file support
- whitespace, to kill trailing whitespace in files
- yajs, Yet Another JavaScript Syntax highlighter
- zeavim, integrate Zeal documentation lookup
- zig.vim, syntax highlighting for the Zig language
These are referenced via git's submodule facility, because this seemed like the cleanest thing. Therefore, after cloning this repo, make sure you also clone the submodules as such:
git submodule init
git submodule update
Then you will have all of the above.
I primarily use git. I don't customize it too heavily, but my
.gitconfig is included here anyway.
I put some scripts in ~/opt/bin that just make my life easier. Most of
these are bash scripts, some are little Python scripts as well. Some of these
are just meant to work around some Linux annoyances.
In vim, I use the Mustang color scheme. I have for a long time now and I
think it'll be hard to ever pry the color scheme away from me.
Mustang uses nice muted colors while still having enough contrast for scanning big chunks of code. I think it feels very zen hacker.
In tmux and screen, I use a "The Matrix"-like green-on-black color
scheme, just so that I know whenever I'm inside a terminal multiplexer.
Unfortunately, there is some trickery involved with color schemes for (virtual) terminals.
The first thing you have to learn about is that most terminals do not automatically place themselves in 256 color mode -- of course, they should, but this is Linux: the software is Free and your time is worthless!
The answer is to be very mindful of two parts of your environment that will dramatically affect the way colors display. These are:
TERMenvironmental variable- Color palette of your terminal emulator
Let's cover these in turn. The TERM environmental variable should be
xterm-256color. Except when it shouldn't, which is when it's running under
tmux or screen (of course). In these environments, it should be
screen-256color. If this isn't set appropriately, programs like vim won't
use your fancy color scheme and you will be sad.
Finally, the color scheme will render differently depending on your color palette. What's going on here is that your terminal emulator can translate the colors being generated by vim and other programs, and translates them to actual pixel colors on your screen. (It's just yet another level of indirection.) I find that most of the default palettes are way too bright and loud.
With gnome-terminal (Linux) and other platform-specific terminals across
macOS and Windows, I tend to pick the Tango palettes, which are a tad muted
and relatively standard across platforms.
Originally, I used GNU screen for all my terminal management, so my
.screenrc is included here. However, I have now switched to tmux, since
I came across a nice book about it and it convinced me. Funny enough, I was
able to port over most of my customizations of screen to tmux pretty
straightforwardly. See .tmux.conf for that.
I also use a clever little tool called tmuxp, which is a Python frontend on
tmux which allows you to save and re-open tmux "sessions".
I use GNOME Desktop with gnome-shell and Wayland. I keep the
keybindings simple, leaning on both the built-in gnome-shell workspace
manager and the Ubuntu Tiling Assistant. These are my key binding
customizations in dconf dump format:
[org/gnome/desktop/wm/keybindings]
begin-move=@as []
begin-resize=@as []
cycle-group=['<Control>grave']
cycle-group-backward=['<Shift><Control>grave']
maximize=@as []
minimize=['<Super>Down', '<Super>z']
move-to-workspace-left=['<Shift><Control><Alt>Left']
move-to-workspace-right=['<Shift><Control><Alt>Right']
switch-to-workspace-left=['<Control><Alt>Left']
switch-to-workspace-right=['<Control><Alt>Right']
toggle-maximized=['<Super>Up', '<Super>x']

[org/gnome/shell/extensions/tiling-assistant]
tile-bottom-half=['<Super>Page_Down']
tile-left-half=['<Super>Left']
tile-right-half=['<Super>Right']
tile-top-half=['<Super>Page_Up']
Typically, I am at a single 1080p landscape monitor, namely the 14" one built-in to my Lenovo X1C. Occasionally I run two 1080p landscape monitors via my laptop built-in plus a portable ASUS ZenScreen MB16AC.
My most ergonomic setup is at my office desk, with 2x 4K monitors, namely two Dell U2723QE's. When at my office desk, I run 1 in landscape mode and 1 in portrait mode. I dock the landscape monitor via a Caldigit TS4 and the portrait monitor via a direct HDMI connection.
Even when I'm running 4K monitors, I use 2X scaling so they behave like 1080p
monitors from a windowing real estate standpoint, just with better PPI and
ergonomics. I enjoy the extra portrait monitor for reading technical ebooks in
PDF or E-PUB format, or for running an extra-tall terminal window where I don't
have to backscroll much to glance at the history. It's because of the portrait
monitor that I customize the tile-top-half and tile-bottom-half
shortcuts, since I never bother with those tiling modes when operating in
landscape monitors.