Shopit is an innovative online shopping application that leverages the power of microservices architecture. With a blend of MySQL AWS RDS and NoSQL MongoDB databases, the platform is built using cutting-edge technologies like Spring Boot, Hibernate, and JPA, ensuring a robust, scalable, and fault-tolerant solution capable of handling a high volume of transactions.
- User authentication and authorization
- Comprehensive product catalog browsing
- Efficient shopping cart management
- Seamless order processing and tracking
- Smooth payment integration
The application is designed following a microservices architecture, where each service is responsible for a specific functionality and communicates with others through REST APIs. The combination of MySQL AWS RDS and NoSQL MongoDB databases ensures optimal data storage and retrieval.

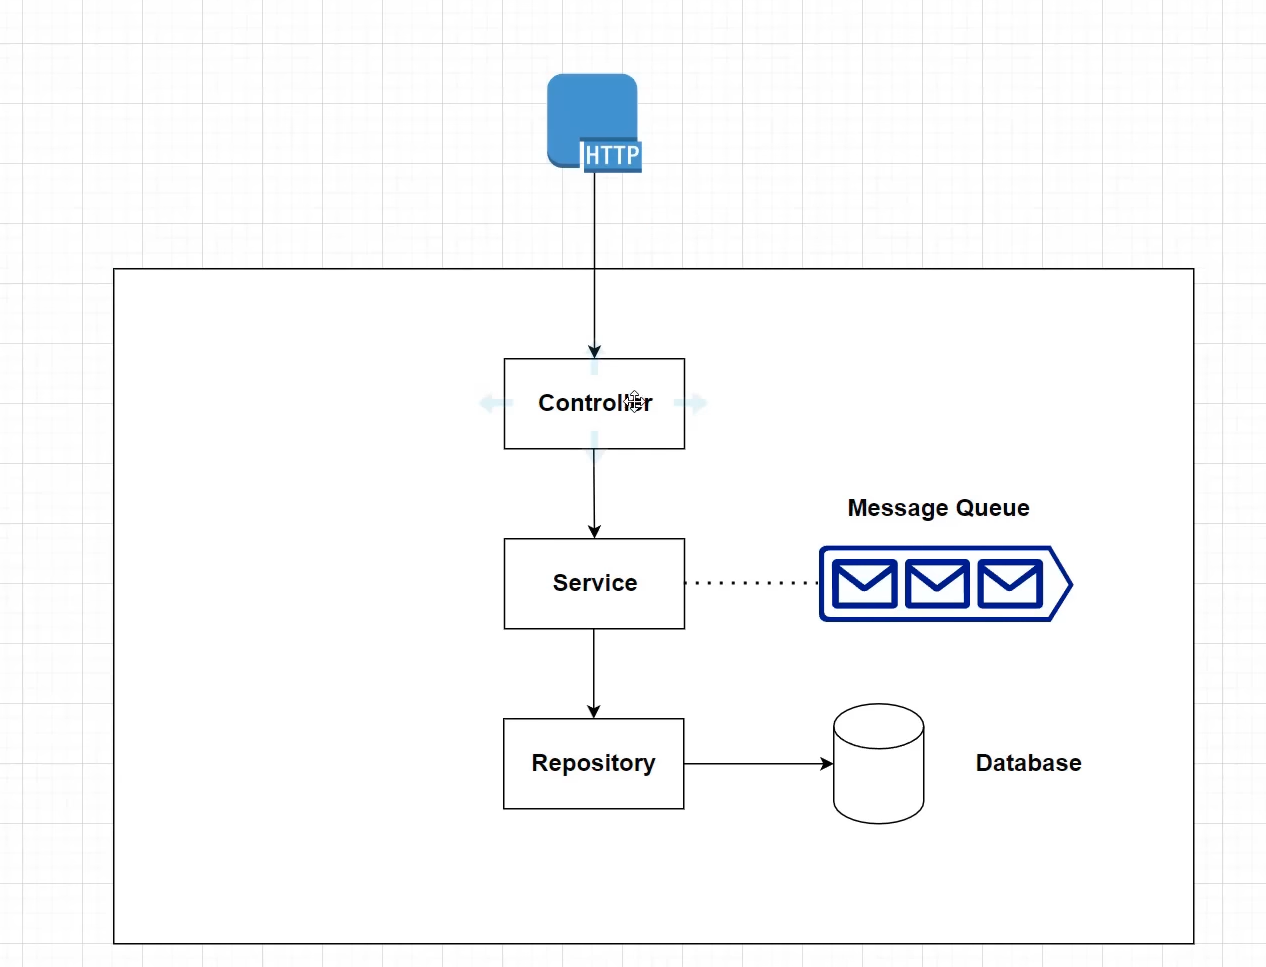

Shopit employs Synchronous Communication when the order service requests product availability from the inventory service. In this case, the inventory service responds to the order service with a response. Shopit utilizes WebClient, which is the recommended choice over RestTemplate due to its modern API and support for sync, async, and streaming scenarios.
When the Order service requests information from the Inventory service but doesn't require an immediate response, it follows an Asynchronous Communication pattern. In this case, the order service initiates a request and continues its operations without waiting for the response, following a fire and forget pattern.
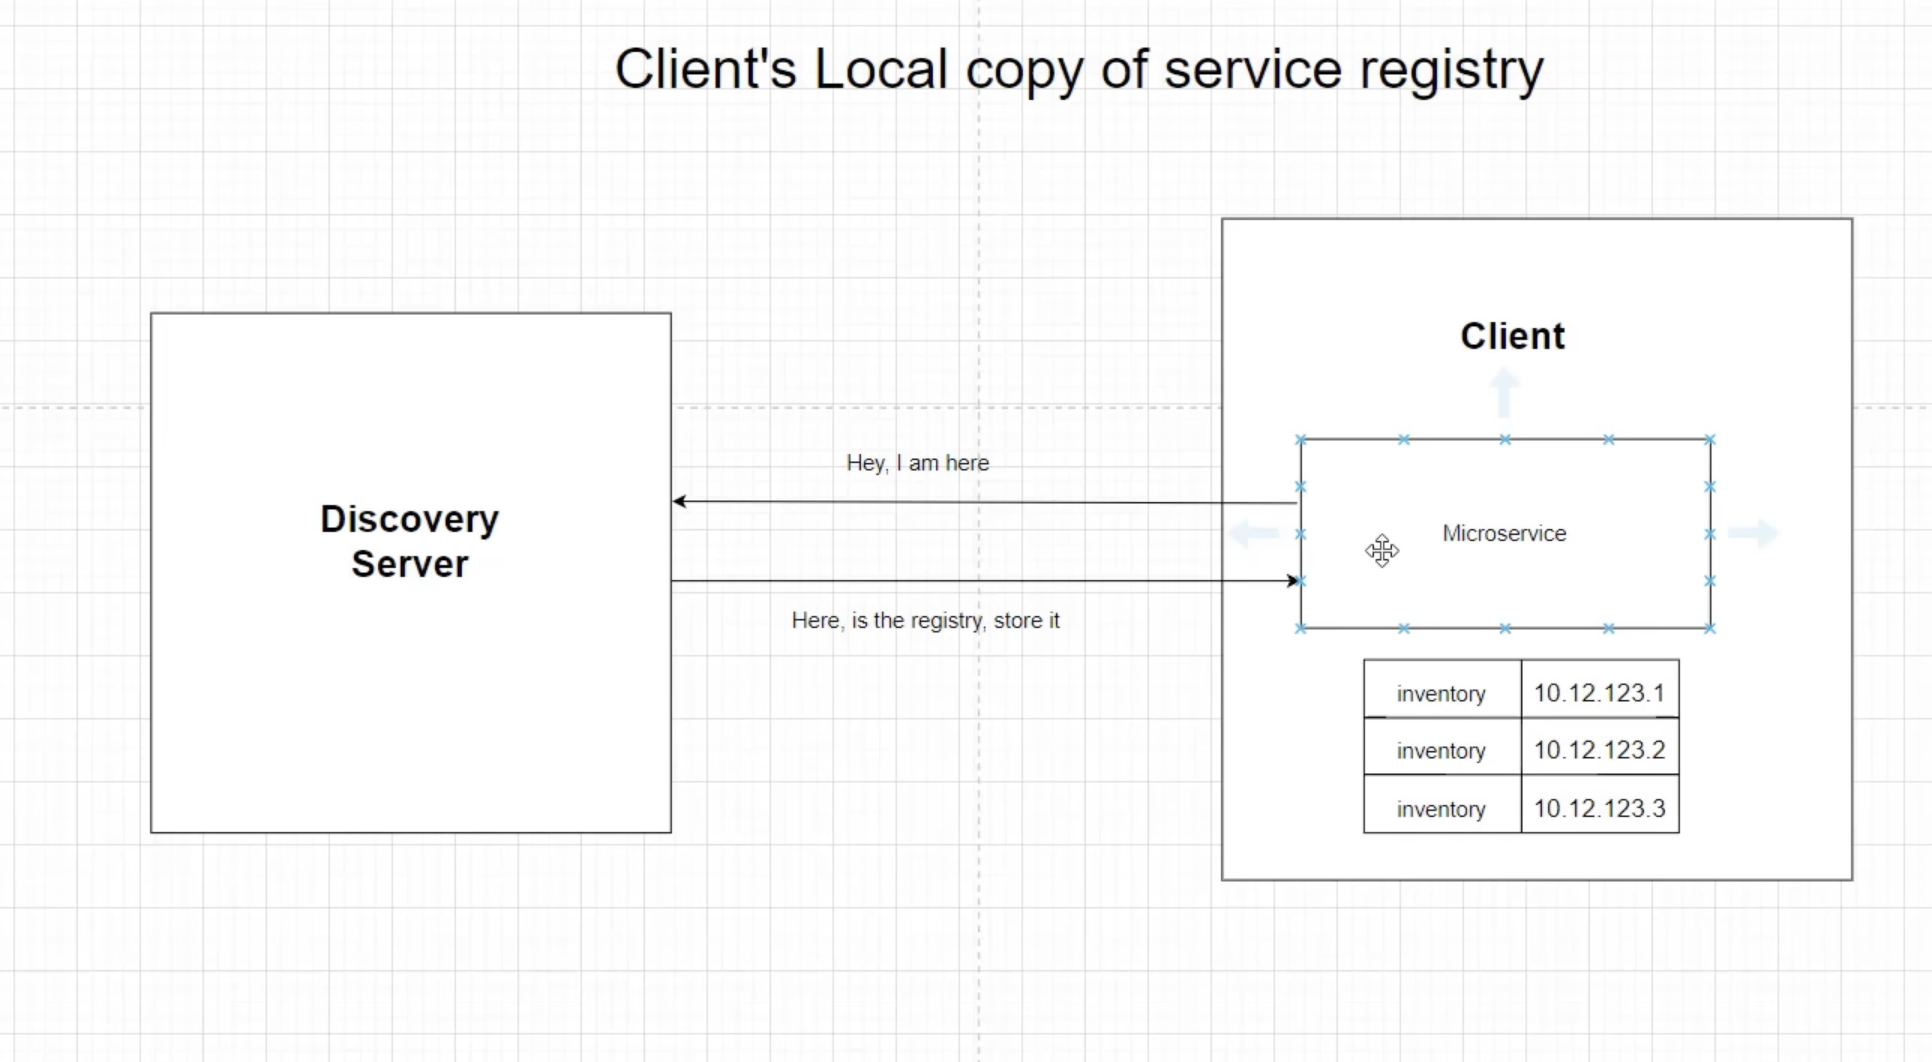
To maintain multiple instances of microservices, Netflix Eureka is used. It enables each client microservice to maintain a local registry.
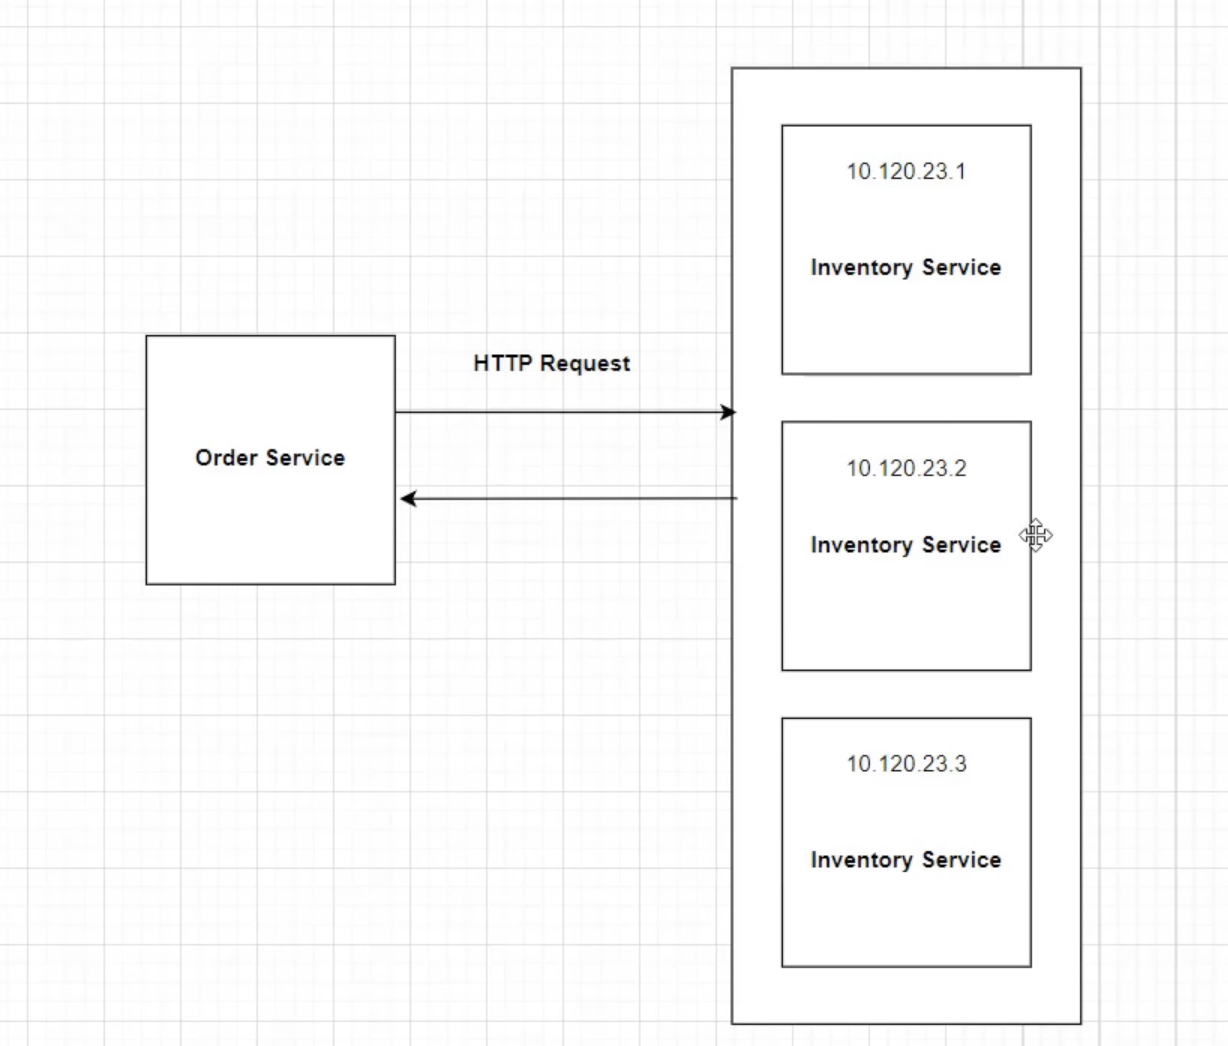
In the example above, multiple instances exist, each with a dynamic IP address. In this case, the order service doesn't know which instance to call. here Service Discovery Pattern comes into play.
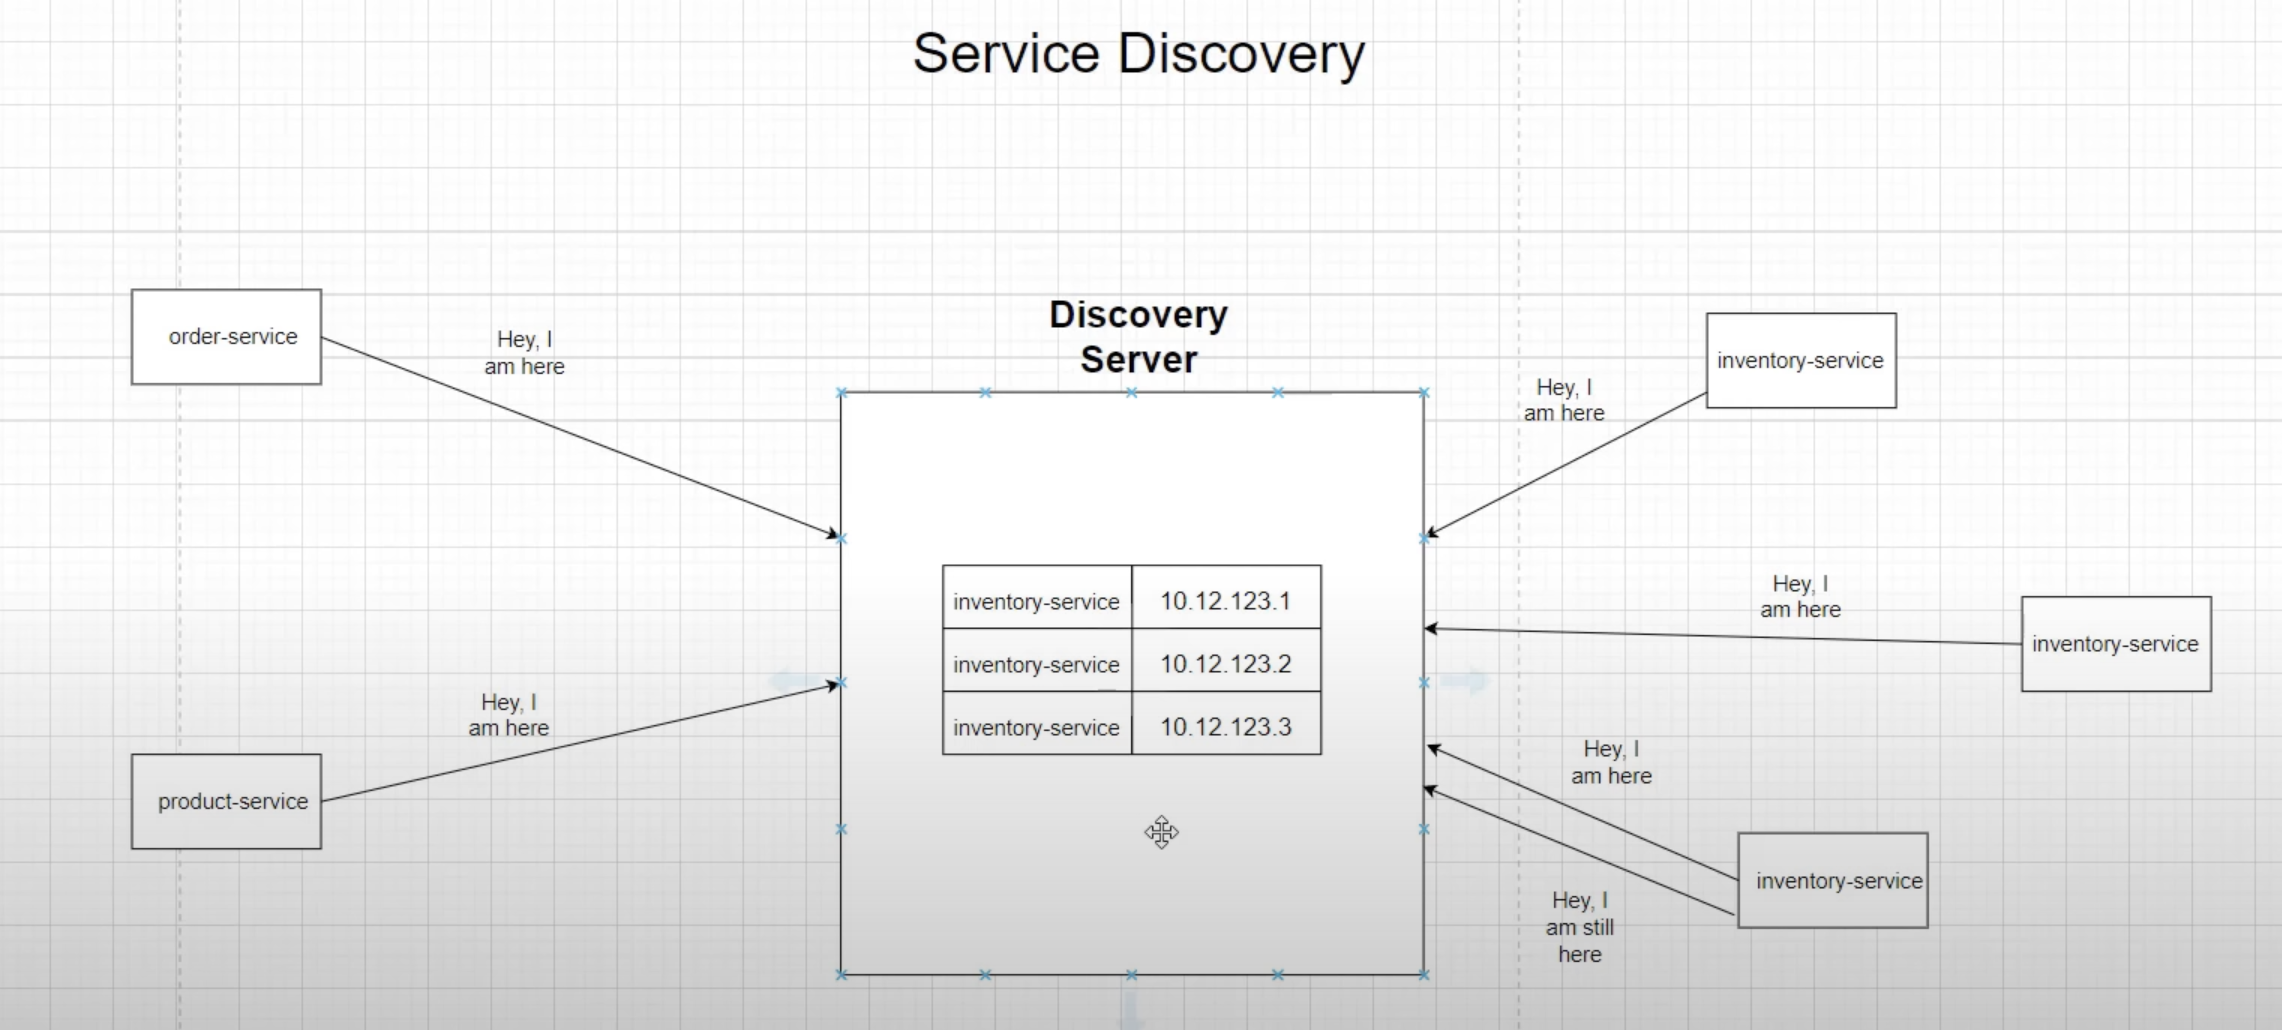
After creating each instance, it gets configured with the Discovery server, and the server adds that instance as a client in its registry.
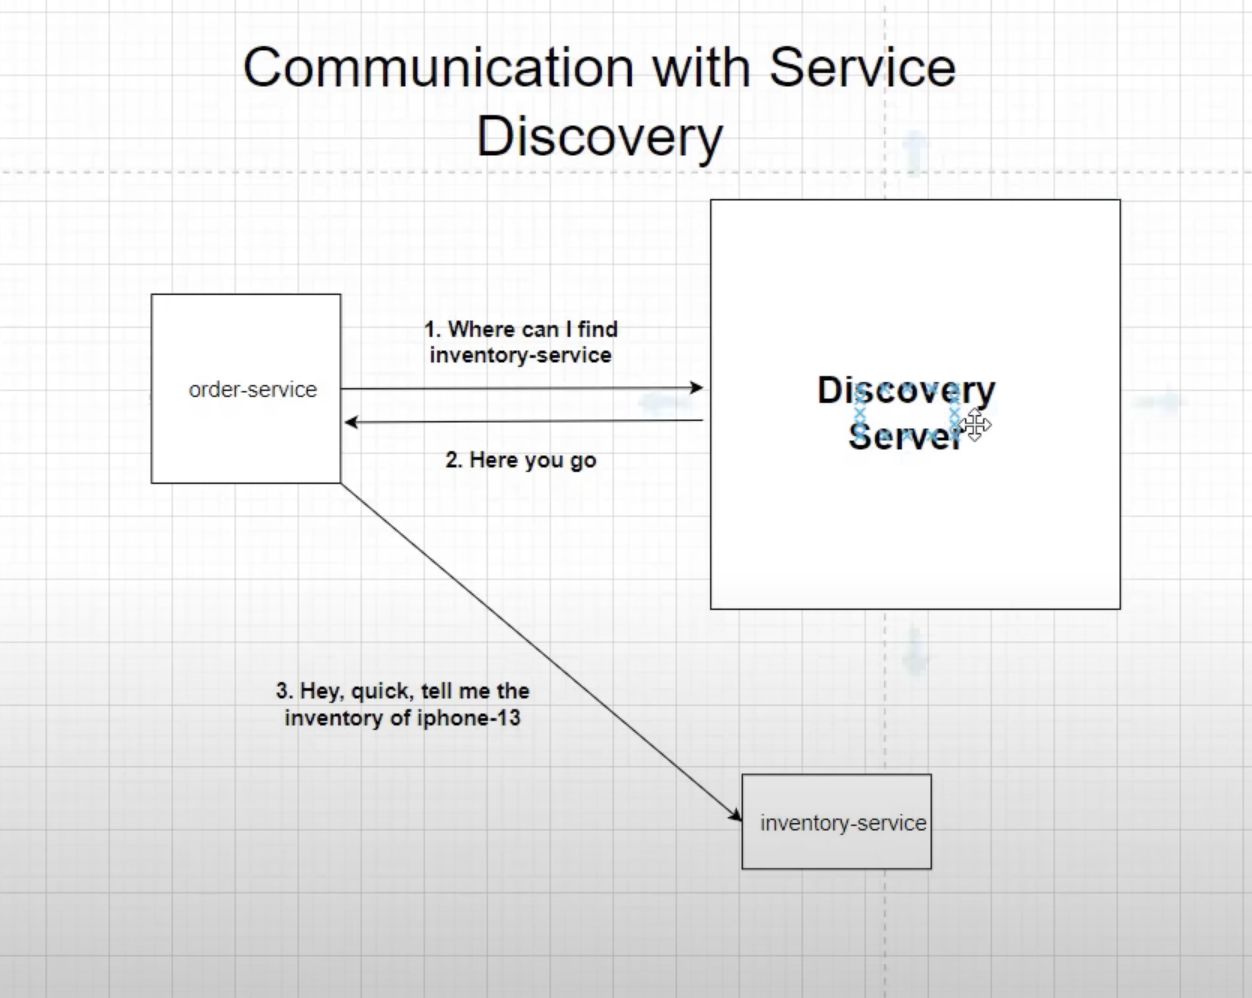
On the creation of an instance, it gets configured with the discovery client. If another microservice wants to use that microservice, the discovery server lets that microservice know which instance to route to.
In the case of a failure of the Discovery Server, once communicated, each microservice also keeps a local registry about other microservice's instances and uses that list to connect to that particular service.
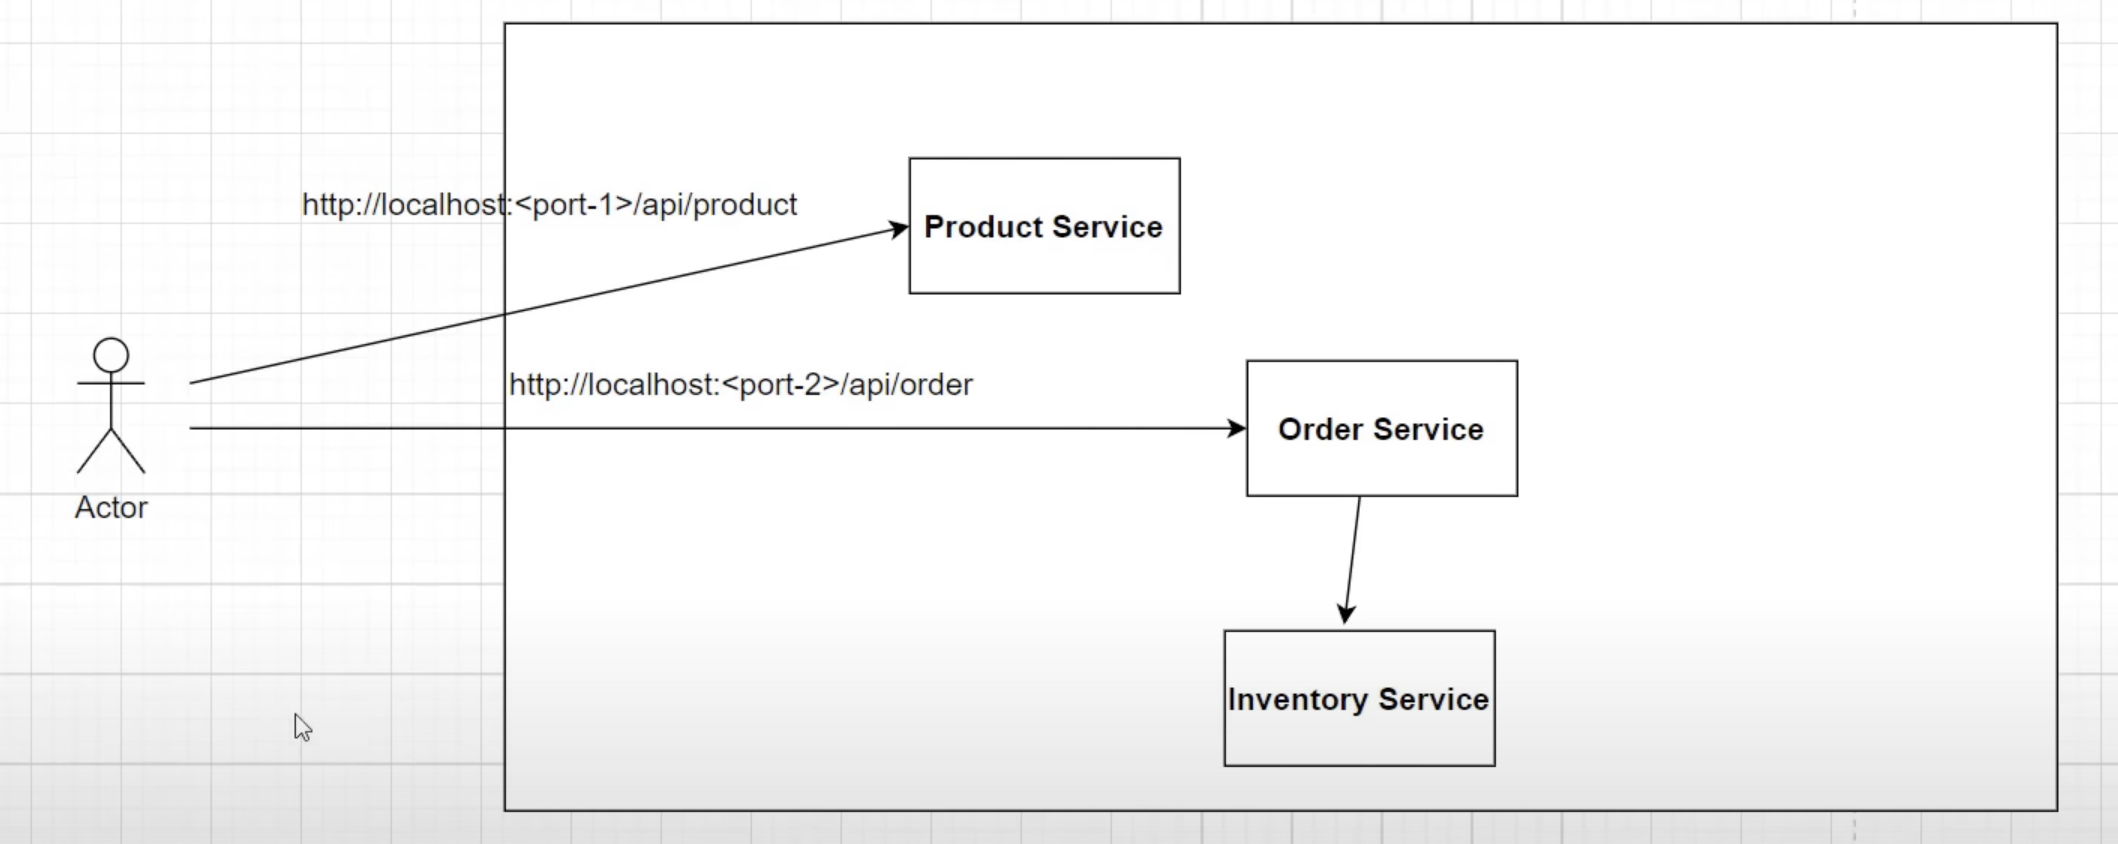
In the development environment, calling a particular service on arbitrary ports (e.g., 8080, 8081, 8082) may work fine. However, in a production environment with multiple instances of one service, this approach is not feasible. This is where the API gateway comes into the picture.
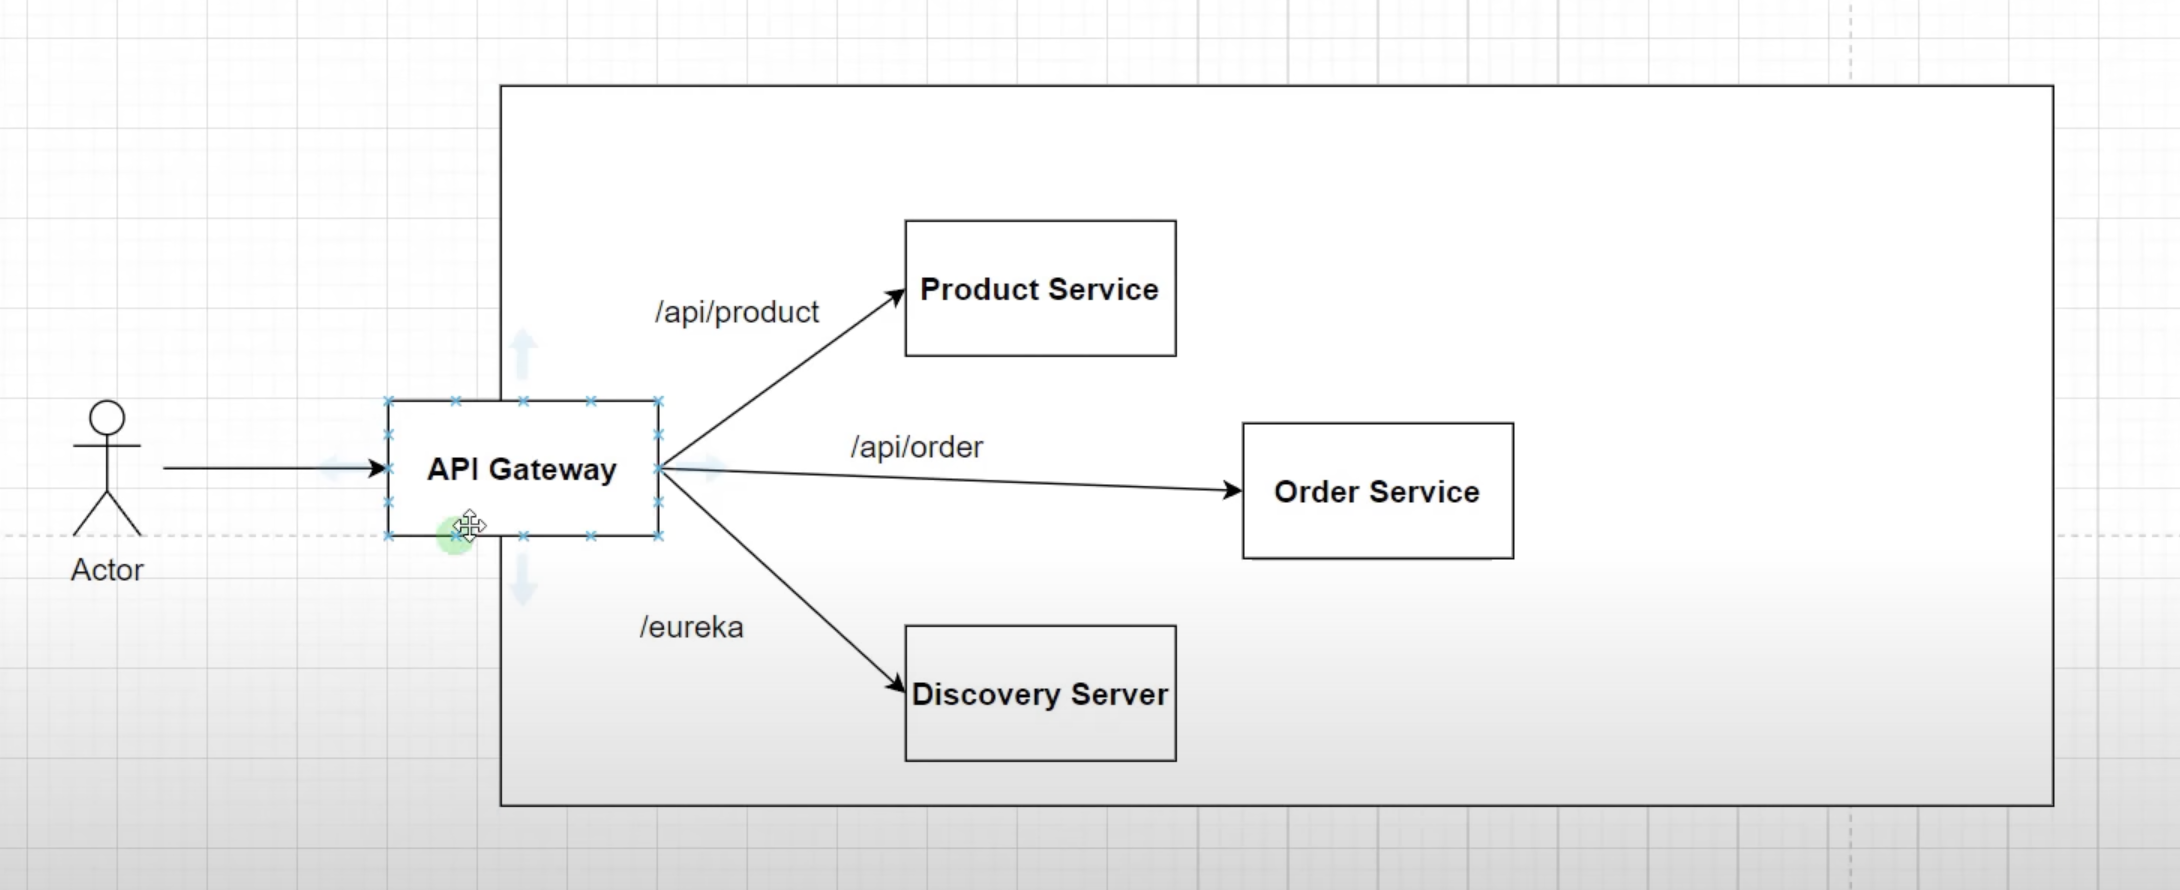
In this project, we use Spring Cloud's own implementation of an API gateway called "Spring Cloud Gateway". It allows modifying requests using filters and provides additional concerns like authentication, security (Keycloak), load balancing for multiple service instances, and SSL termination for terminating HTTPS calls at the API Gateway layer.
This repository demonstrates the implementation of Keycloak as an authorization server to secure microservices in our architecture. Prior to integrating Keycloak, all services were accessible without any authentication, which posed security risks. By utilizing Keycloak, we have fortified the system with robust authentication and authorization mechanisms.
To run Keycloak, we recommend using Docker, which simplifies the setup process. Follow these steps:
-
Ensure you have Docker installed on your system.
-
Open a terminal and execute the following command to run the Keycloak container:
docker run -p 9090:8080 -e KEYCLOAK_ADMIN=admin -e KEYCLOAK_ADMIN_PASSWORD=admin quay.io/keycloak/keycloak:22.0.1 start-dev
This command will pull the Keycloak image from Docker Hub and start the Keycloak server. It also sets up the admin user with the provided credentials (admin/admin in this case). Adjust the version number in the image tag if needed.
If you prefer not to use Docker, you can download the Keycloak zip file for your operating system from the official Keycloak website. Follow these steps:
-
Download the appropriate Keycloak zip file for your operating system.
-
Unzip the downloaded file and locate the keycloak.conf file inside the conf folder.
-
Open the keycloak.conf file and modify the http-port property at the end of the file to set your desired port, for example: http-port=9090
-
Start Keycloak by executing the following command in the downloaded folder: sudo bin/kc.sh start-dev
This will start Keycloak locally with the specified configuration, including the custom port (9090 in the example).
Please note that using Docker is recommended for consistency and ease of deployment across various environments. However, the alternate method provides flexibility for specific use cases or preferences.
In our microservices architecture, we have successfully implemented an authentication mechanism using Keycloak for our order and product services. However, we have yet to configure authentication for our discovery server. The reason is that the discovery server is accessed through a web browser, not through a tool like Postman, which allows us to add authentication parameters easily.
To address this, we will enable basic authentication for the discovery server. Basic authentication allows us to provide a username and password when accessing the discovery server's URL. This way, we can secure access to the server without the need for complex token-based authentication like in the other services.
To enable basic authentication for the discovery server, follow these steps:
-
Open the configuration file of the discovery server (e.g., application.properties).
-
Add the following properties to enable basic authentication:
spring.security.user.name=your_username
spring.security.user.password=your_password
Replace your_username and your_password with the desired credentials. The ROLE_USER specifies the role assigned to the authenticated user.
Save the changes and restart the discovery server for the new configuration to take effect.
After enabling basic authentication, when you access the discovery server's URL through a web browser, you will be prompted to enter the username and password. Upon successful authentication, you will be granted access to the discovery server's information and endpoints.
Please note that basic authentication is suitable for browser-based access but may not be ideal for programmatic access or API calls. For API calls, we recommend continuing to use the Keycloak-based authentication in the order and product services, as it provides more robust security features.
With basic authentication in place for the discovery server, our microservices architecture will be better protected against unauthorized access, ensuring a more secure environment for our applications.
The Circuit Breaker pattern is mainly used when we want to ensure resilient communication between our services.

In our microservices architecture, the order service communicates with the inventory service to check the availability of products using a Web Client, which operates like synchronous communication. However, synchronous communication poses certain challenges. The inventory service may not always be available, and there might be delays in its response when called from the order service. Additionally, remote service calls can be slow if something goes wrong with the inventory service, such as performance issues or database problems, resulting in slow API calls.
To address these potential issues and ensure system resilience, we need to handle failures gracefully and avoid abrupt terminations of requests. We aim to "fail fast" and provide resiliency to cope with these challenges in a microservice environment.
The Circuit Breaker pattern is a mechanism that helps us achieve this goal. It involves maintaining a set of states within our application to manage potential failures in remote service calls.
By implementing the Circuit Breaker pattern, we can improve the stability and reliability of our microservices architecture, ensuring that our system can gracefully handle issues and maintain responsiveness.

As shown in the above diagram of circuit breaker states, the Circuit Breaker pattern helps manage communication failures between services. In our case, the order service and the inventory service communicate with each other. If there is a failure of communication due to a network issue or a database problem, the circuit breaker enters the "open" state from the "closed" state and prevents calls from the order service to the inventory service for a certain amount of time. The duration of this period can be configured according to our needs. During this time, the circuit breaker can either throw an error message or execute a fallback logic to handle the situation gracefully.
After the specified time period, the circuit breaker enters the "half-open" state and begins to check whether the requests are going through successfully by gradually allowing some API calls from the order service to the inventory service. If these requests are executed successfully, the circuit breaker transitions back to the "closed" state, indicating that the communication is restored and reliable. However, if the requests continue to fail, the circuit breaker will revert to the "open" state, ensuring that further calls to the inventory service are blocked until it's safe to retry.
The Circuit Breaker pattern helps protect the overall system from cascading failures and ensures that the communication between microservices remains robust and resilient.
To implement this logic we are using Resilience4J library.
We can check the health of actuator by hitting http://localhost:52476/actuator/health
replace the port number with the order-service's port number.
In our system, we have already implemented the circuit breaker pattern with functionalities such as retry, timeout, and fallback mechanisms, provided by the resilience4j library. This has made our system quite resilient, and we can check logs to track down issues. However, relying solely on logs may not be sufficient in a production setting, where there could be millions of logs to manually inspect. To address this, we have adopted a design pattern called distributed tracing, which helps us track requests from start to end.

As shown in the diagram above, when a user places an order, the request first passes through an API Gateway, then reaches the order service, and eventually calls the inventory service to check product availability. To trace this flow of requests, we use a trace ID and span ID.
-
Trace ID: This is a unique identifier assigned to a request. It allows us to track the entire lifecycle of the request.
-
Span ID: A span represents a trip to a service. For example, in our case, a user placing an order involves three trips. The first trip goes to the API Gateway, the second to the order service, and the last one to the inventory service. Each span has a unique span ID, which helps identify issues that may occur during the request's lifecycle.
We have integrated Spring Cloud Sleuth, a distributed tracing framework, into our system. Spring Cloud Sleuth helps generate and propagate trace IDs and span IDs across different services, making it easy to follow the request flow.
To visualize and analyze this tracing information, we use a tool called Zipkin. Zipkin provides a user-friendly interface to view and analyze the traces, helping us quickly identify and troubleshoot any issues that may arise in the system.
By leveraging distributed tracing with Spring Cloud Sleuth and Zipkin, we can gain valuable insights into our system's behavior and ensure a more reliable and efficient production environment.
to access zipkin I have used docker way
I have used below command to run docker container.
docker run -d -p 9411:9411 openzipkin/zipkin
You can access Zipkin on port 9411 by hitting: http://localhost:9411
In our project architecture, we have implemented an Event-Driven Architecture (EDA) using Kafka to facilitate communication and decouple services. Specifically, we have the following interactions between services:
-
Order Service and Inventory Service:
- The Order Service interacts with the Inventory Service to check the availability of the requested products before placing an order.
- This interaction is synchronous, as the Order Service needs an immediate response from the Inventory Service.
-
Order Service and Notification Service:
- After successfully placing an order, the Order Service sends a notification to the user as an acknowledgment message.
- This interaction is asynchronous, meaning the Order Service does not wait for the Notification Service to respond immediately.
To achieve asynchronous communication, we have integrated Apache Kafka, a distributed event streaming platform, into our architecture. Kafka enables us to build a robust and scalable event-driven system. In our setup, the Order Service acts as the "Producer," while the Notification Service acts as the "Consumer."
-
Producing Events:
- When the Order Service successfully places an order, it generates an event (e.g., "OrderPlacedEvent") and publishes it to the Kafka broker.
- Kafka brokers are responsible for storing and managing events, ensuring durability and replication.
-
Consuming Events:
- The Notification Service subscribes to the relevant topic on the Kafka broker, waiting for events to be published.
- When a new event (e.g., "OrderPlacedEvent") is published, the Notification Service consumes it.
- Loose Coupling: Services are decoupled, meaning they can evolve independently without impacting each other significantly.
- Scalability: Kafka's distributed nature allows for horizontal scaling to handle large event loads.
- Fault Tolerance: Kafka provides replication and fault-tolerant mechanisms, ensuring events are not lost even if a service or broker fails.
- Real-time Processing: Asynchronous communication enables real-time event processing, improving system responsiveness.
Our adoption of Event-Driven Architecture using Kafka enhances the robustness and flexibility of our microservices-based online shopping platform, leading to a more efficient and responsive system.
To set up a suitable environment for using Apache Kafka locally, follow these steps:
-
Download the latest stable release of Kafka from the following link: https://kafka.apache.org/downloads. Downloading the Kafka binary distribution provides a pre-compiled and ready-to-use version of Kafka, eliminating the need to compile and build the code.
-
Kafka uses ZooKeeper for managing its brokers and maintaining metadata. To start ZooKeeper, open a terminal and navigate to the downloaded and extracted Kafka folder. Run the following command:
bin/zookeeper-server-start.sh config/zookeeper.properties
Keep this terminal running as ZooKeeper will continue running in the background.
-
After ZooKeeper is running, open another terminal tab in the same Kafka folder and start the Kafka broker by running the following command:
bin/kafka-server-start.sh config/server.properties
Keep this terminal running as well. The Kafka broker is now up and running.
-
Next, we need to create a Kafka topic to which the producer (order service) will send messages, and the consumer (notification service) will read from. In a new terminal tab (still in the Kafka folder), run the following command, replacing "test_topic" with your desired topic name. This name should be the same in both the producer and consumer classes:
bin/kafka-topics.sh --create --topic notificationTopic --bootstrap-server localhost:9092 --partitions 1 --replication-factor 1
-
Finally, restart the application (order and notification services) to utilize Kafka for event-driven communication.
Make sure to have Kafka running and the topic created before starting your application to ensure smooth communication between the producer and consumer components. With this setup, you can build an event-driven architecture using Apache Kafka for your applications.
- Run
mvn clean package -DskipTeststo build the applications and create the docker image locally. - Run
docker-compose up -dto start the applications.
- Run
mvn clean verify -DskipTestsby going inside each folder to build the applications. - After that run
mvn spring-boot:runby going inside each folder to start the applications.
We welcome contributions to improve and expand the functionality of this microservices architecture. If you find any issues or have new ideas, please feel free to open an issue or submit a pull request.
Let's secure our microservices with Keycloak and build a safer and more reliable system together!