template: ../media/TB4Template.pptx
- Familiarize yourself with the TurtleBot 4
- Connect the TurtleBot 4 to your local WiFi.
- Update the TurtleBot 4
- Connect to the TurtleBot
- Run the teleop launch files.

- There are two variants of the TurtleBot 4.
- TODO: DIAGRAMS
- Turtle Bot 4 includes:
- iRobot Create 3
- RaspberryPi 4b - 4GB
- OAK-D Pro
- RPLidar
- Circuit Board
- TurtleBot4 Lite
- Plug in dock, and place robot on dock to power it on.
- It will take a few minutes for the robot to boot.
- Using a Linux PC to connect to RPI in your WiFi settings:
- SSID:
Turtlebot4Password:Turtlebot4
- SSID:
- SSH into robot from the same laptop:
ssh ubuntu@10.42.0.1- Password:
turtlebot4
- Password:
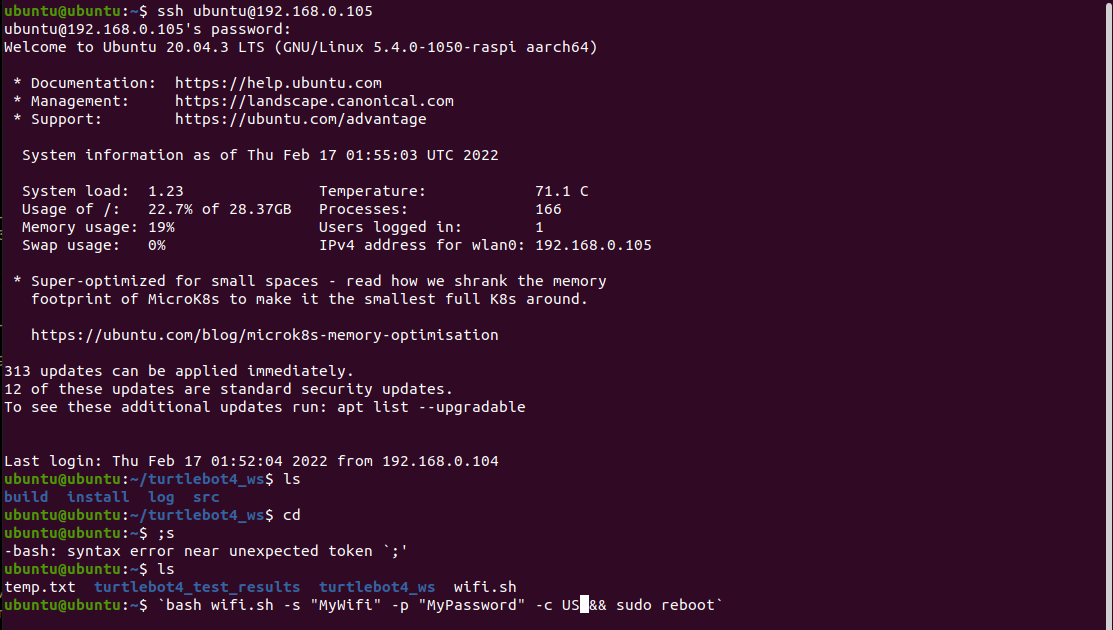
- The TurtleBot comes with a preinstalled WiFi setup script.
- Call
sudo wifi.sh -s "wifi_ssid" -p "wifi_password" -r REG_DOMAIN && sudo reboot REG_DOMAINdepends on your country, see this list.- USA:
US, Canada:CA, UK:GB, Germany:DE, Japan:JP3, Spain:ES.
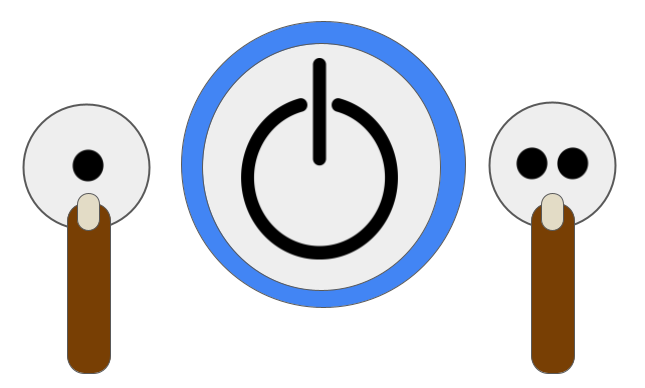
- TurtleBot has not one, but two computers on board and each of them needs to be connected to wifi.
- This procedure is used to connect the Create3 to your wireless network.
- Press both button 1 and 2 on the Create3 simultaneously until the light ring turns blue.
- The Create3 is now in AP mode, connect to its WiFi
Create-XXXX - In your web browser go to
192.168.10.1 - Click connect and enter your wifi SSID and password
- Wait for it to connect to wifi, the ring light will turn white.
- Give your TB4 a minute to save its configuration.
- Reboot the Turtlebot4 by pressing
- The TB4 should have a white ring light and play a tone when it has started.
- Now find your TurtleBot's IP address
- Open a terminal and SSH into the robot using:
ssh ubuntu@<TB4 IP> - The password is
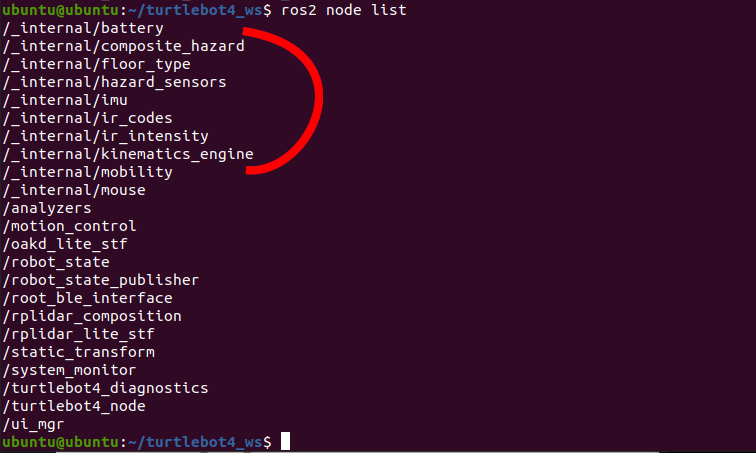
turtlebot4 - Let's check that everything is connected to the network, run the command
ros2 node list
- You should see the
_internal/*nodes.- If these nodes are not visible then the Create3 is not connected to the network.
- Now let's connect to the robot and put it in teleoperation.
- For this you'll need a bluetooth PS4 controller. Make sure it is charged!
- ssh into the robot and run the following commands to enable bluetooth pairing.
sudo bluetoothctldefault-agentscan on- After entering scan on the controller will respond, "Discovery started"
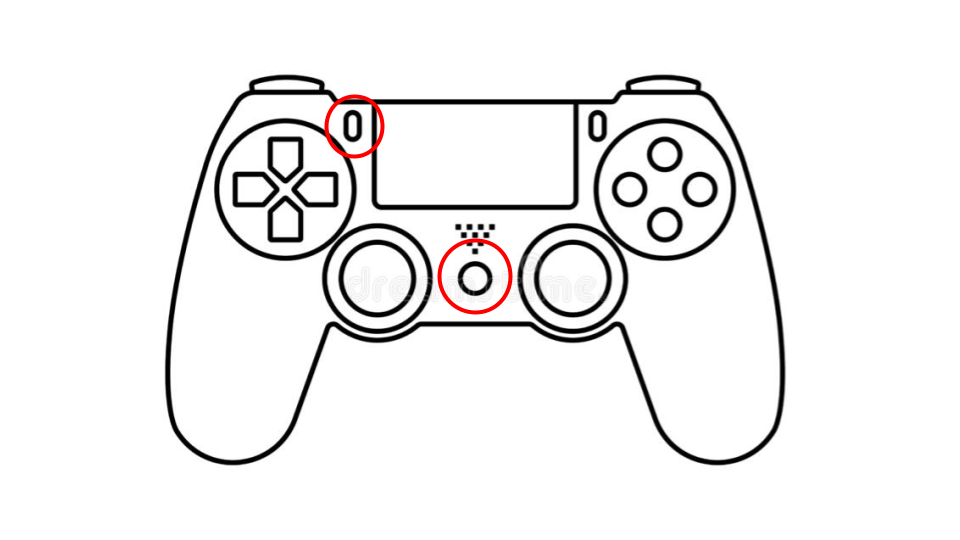
- Now we'll put the controller into pairing mode by pressing and briefly holding the two buttons shown on the diagram.
- The front light will start blinking rapidly twice in a row.
- You should see something like
[NEW] Device D8:E8:DD:8A:B9:30 <some string> - At some point you should see something like
[NEW] Device D8:E8:DD:8A:B9:30 Wireless Controller
- Once you see the controller copy its MAC address. It is the series of numbers of letters separated by colons.
- Now run the following where is your controller's unique MAC address.
trust <MAC>pair <MAC>connect <MAC>
- You have now paired your bluetooth controller. You can exit the controller by calling
exit - On subsequent connections you won't need to run through every step. Instead you can run:
- Check the controller is running with:
ubuntu@ubuntu:~/turtlebot4_ws$ sudo bluetoothctl paired-devices- Press buttons on controller
devices-- bluetooth will list devicesconnect <MAC>exit
- If the device is there you're good to go.
- Otherwise follow the steps above.
- If you see an error like Waiting
to connect to bluetoothd...- The Bluetooth daemon is not running. Try running
sudo systemctl start bluetooth - To make Bluetooth always start run,
sudo systemctl enable bluetooth
- The Bluetooth daemon is not running. Try running
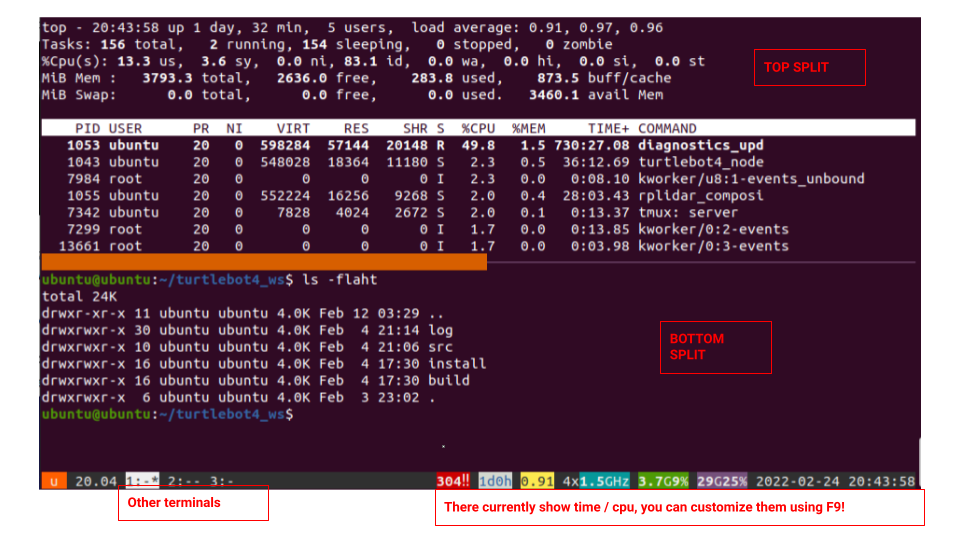
- Before we put the robot into teleoperation mode, we need to review how to open multiple terminals in an SSH session.
- There are many terminal managers, also called multiplexers available for Linux. Examples include Byobu, Tmux, and GNU Screen.
- For our examples, we'll use Byobu, but you can use whatever you're comfortable with! It is also worth noting that byobu generally uses tmux as its backend.
- To start byobu simply type
byobuin your terminal.- If byobu is not installed, simply run
sudo apt install byobu.
- If byobu is not installed, simply run
- To create a new terminal simply press
F2. - To page through terminals use
F3andF4. shift-F2- Split the screen horizontally andctrl-F2Split the screen vertically.shift-F3- Shift the focus to the previous andshift-F4Shift to the next split .ctrl-F6- Remove this splitctrl-F5- Reconnect GPG and SSH sockets- Full documentation can be found here. or by running
man byobu, orshift-F1in Byobu.
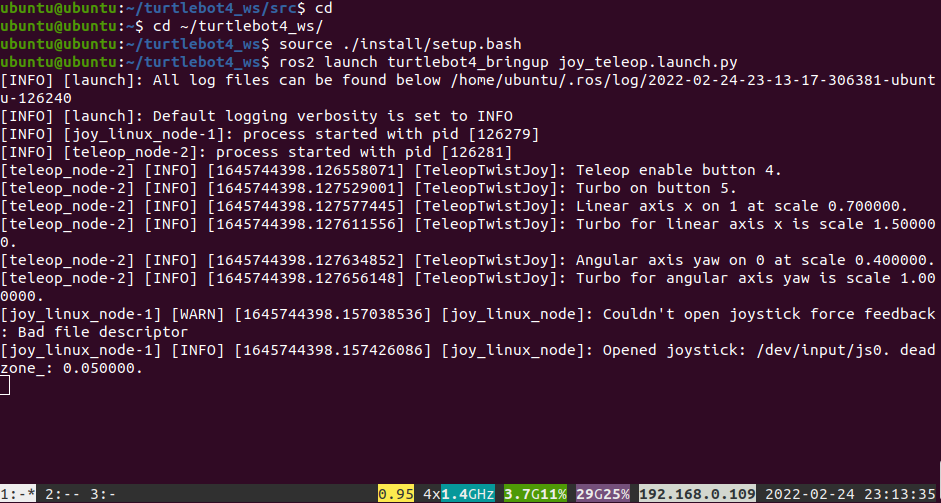
- ROS 2 uses "launch" files to run collections of small programs called nodes.
- We're going to run a launch file called "joy_teleop.launch.py", where "joy_teleop" means "joystick teleoperation"
- Create a terminal in your robot ssh session and run the following:
cd ~/turtlebot4_ws- Move to our ROS 2 "workspace."
source ./install/setup.bash- Tell the terminal we're using this ROS 2 workspace.
ros2 launch turtlebot4_bringup joy_teleop.launch.py- Run the program
joy_teleop.launch.pyfound in the directory~/turtlebot4_ws/src/turtlebot4/turtlebot4_bringup/launch/.
- Run the program
- A bunch of stuff should appear on the screen.
- Note that the
tabkey should automatically complete most of these commands after you enter the first few letters.
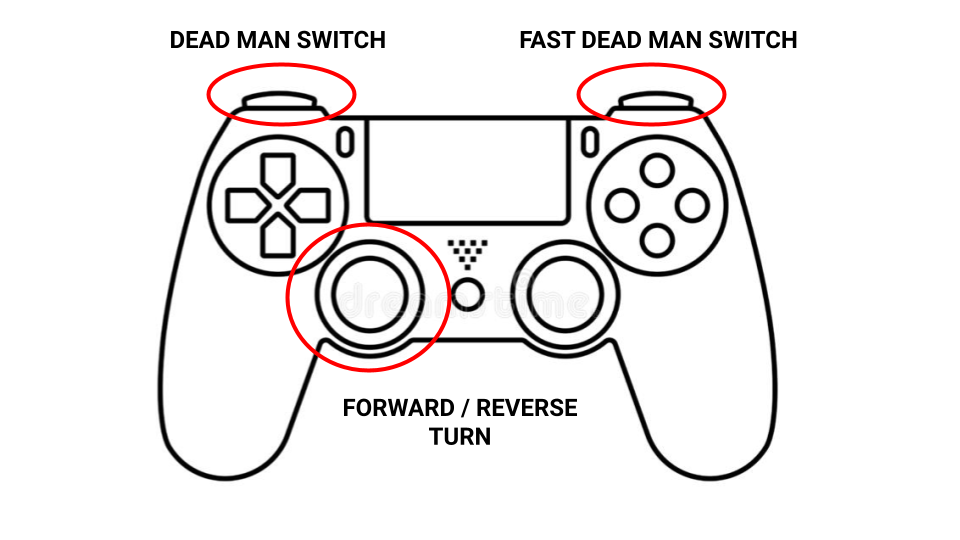
- The TurtleBot4 controller operates as a "dead man's switch."
- A "dead man's" switch is a safety feature that is often used with robot controllers. The user must hold down the "dead man switch" at all times; this prevents the robot from moving if the controller is dropped or misplaced.
- For this controller "L", the button near your left index finger, is the deadman switch.
- There is a second dead man switch, the "R" button near your right index finger. This switch makes the robot move faster.
- The left joystick controls the robot's direction.
- The robot is smart, and will temporarily disable the controller if hits a cliff or a big bump. It may also do this if you reverse suddenly. This mode is indicated by the ring light turning yellow.
- TODO: These two do not work.
ros2 action send_goal /undock irobot_create_msgs/Undock '{}'ros2 action send_goal /dock irobot_create_msgs/DockServo '{}'
- If you don't have a joystick, or don't feel like connecting it to the robot, you can also teleoperate it with a your keyboard.
- The steps are similar to the teleoperation mode.
- Create a terminal in your robot ssh session and run the following:
cd ~/turtlebot4_ws- Move to our ROS 2 "workspace."
source ./install/setup.bash- Tell the terminal we're using this ROS 2 workspace.
ros2 launch turtlebot4_bringup joy_teleop.launch.py- Run the program
joy_teleop.launch.pyfound in the directory~/turtlebot4_ws/src/turtlebot4/turtlebot4_bringup/launch/.
- Run the program
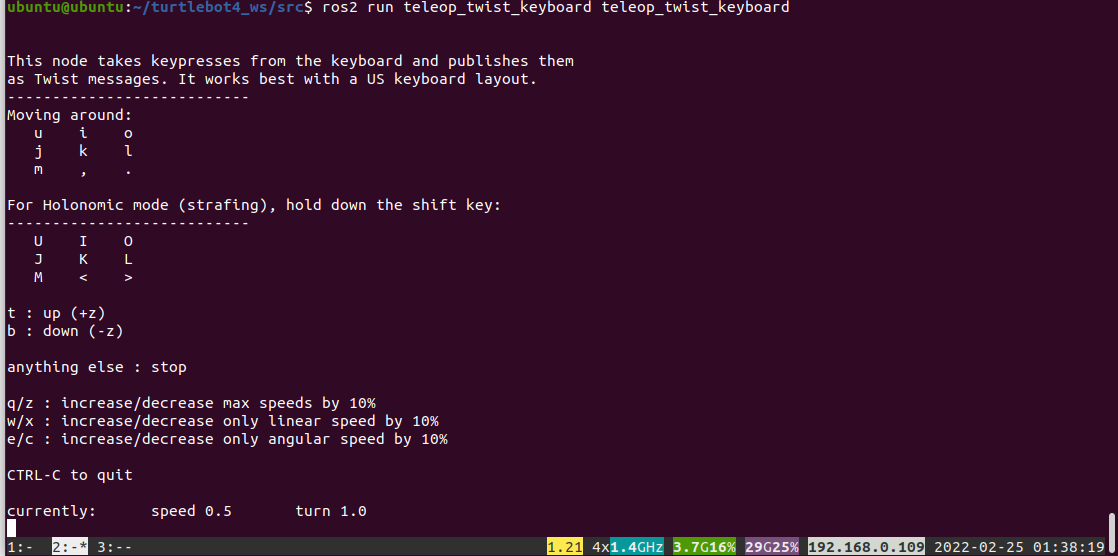
- Now, in a new byobu terminal kick off the keyboard teleoperation.
ros2 run teleop_twist_keyboard teleop_twist_keyboard- Follow the directions on the screen.
- To exit hit
CTRL+C.

- Teleoperation is fun, but what if we want to move the TurtleBot to a nearby room and pilot it using the camera?
- To do this we'll need a second laptop running ROS!
- On our laptop we'll run a program called
RVIZ. - RVIZ is ROS's one stop shop for visualizing a running robot.
- RVIZ let's you see cameras, lidar, maps, the robot's state, and a whole bunch of other important information about your robot.
- To install RVIZ we'll first need to install ROS 2 on our laptop.

- We'll install
ROS 2 Galactic Geocheloneon your laptop. - How you install ROS 2 will depend on your host will depend on your host OS.
- While ROS is open-source and can run on just about any OS, it doesn't mean it is easy to run it on every OS.
- If you are running Ubuntu 20.04 Focal Fossa then you can install ROS easily.
- If you ARE NOT running Ubuntu 20.04 then we recommend that you:
- Install a virtual machine client.
- Create a virtual machine and install Ubuntu 22.04.
- Follow the directions above inside of the virtual machine.
- We have created this tutorial for this process.

- If the installation completed successfully you should be able to do the following:
- Create a new terminal.
- Activate ROS by calling
source /opt/ros/galactic/setup.bash - We will use a program called
ros2 doctor. ROS Doctor is a command that will print out a variety of information about a ROS 2 system. - Call
ros2 doctor- If everything worked successfully that last line of the command should report:
*
All 4 checks passed - If something failed the ROS 2 Doctor should report something.
- Run
ros2 doctor --reportand work with someone to correct the issue.
- Run
- If everything worked successfully that last line of the command should report:
*
- We just installed ROS, but we still need to install RVIZ.
- We'll use a tool called apt to install RVIZ.
- Apt, also called Aptitude is the Debian/Ubuntu package manager. You can find, install, upgrade, and uninstall just about anything using Apt.
- It is worth familiarizing yourself with apt by running
apt --help - Run the command:
sudo apt install ros-galactic-rviz2 - Warning: Apt will spit out a ton of information as it installs the package for you!
- If RVIZ2 installed successfully starting it should be fairly straight forward.
- First we intialize ROS by calling:
source /opt/ros/galactic/setup.bash
- If everything is setup correctly you should be able to run the following command and see all of the topics, or data streams on the robot.
ros2 topic list- ROS should spit out three dozen topics with names like
\battery_stateand\wheel_vels.
- Now we'll start RVIZ. In the terminal where you sourced setup.bash call:
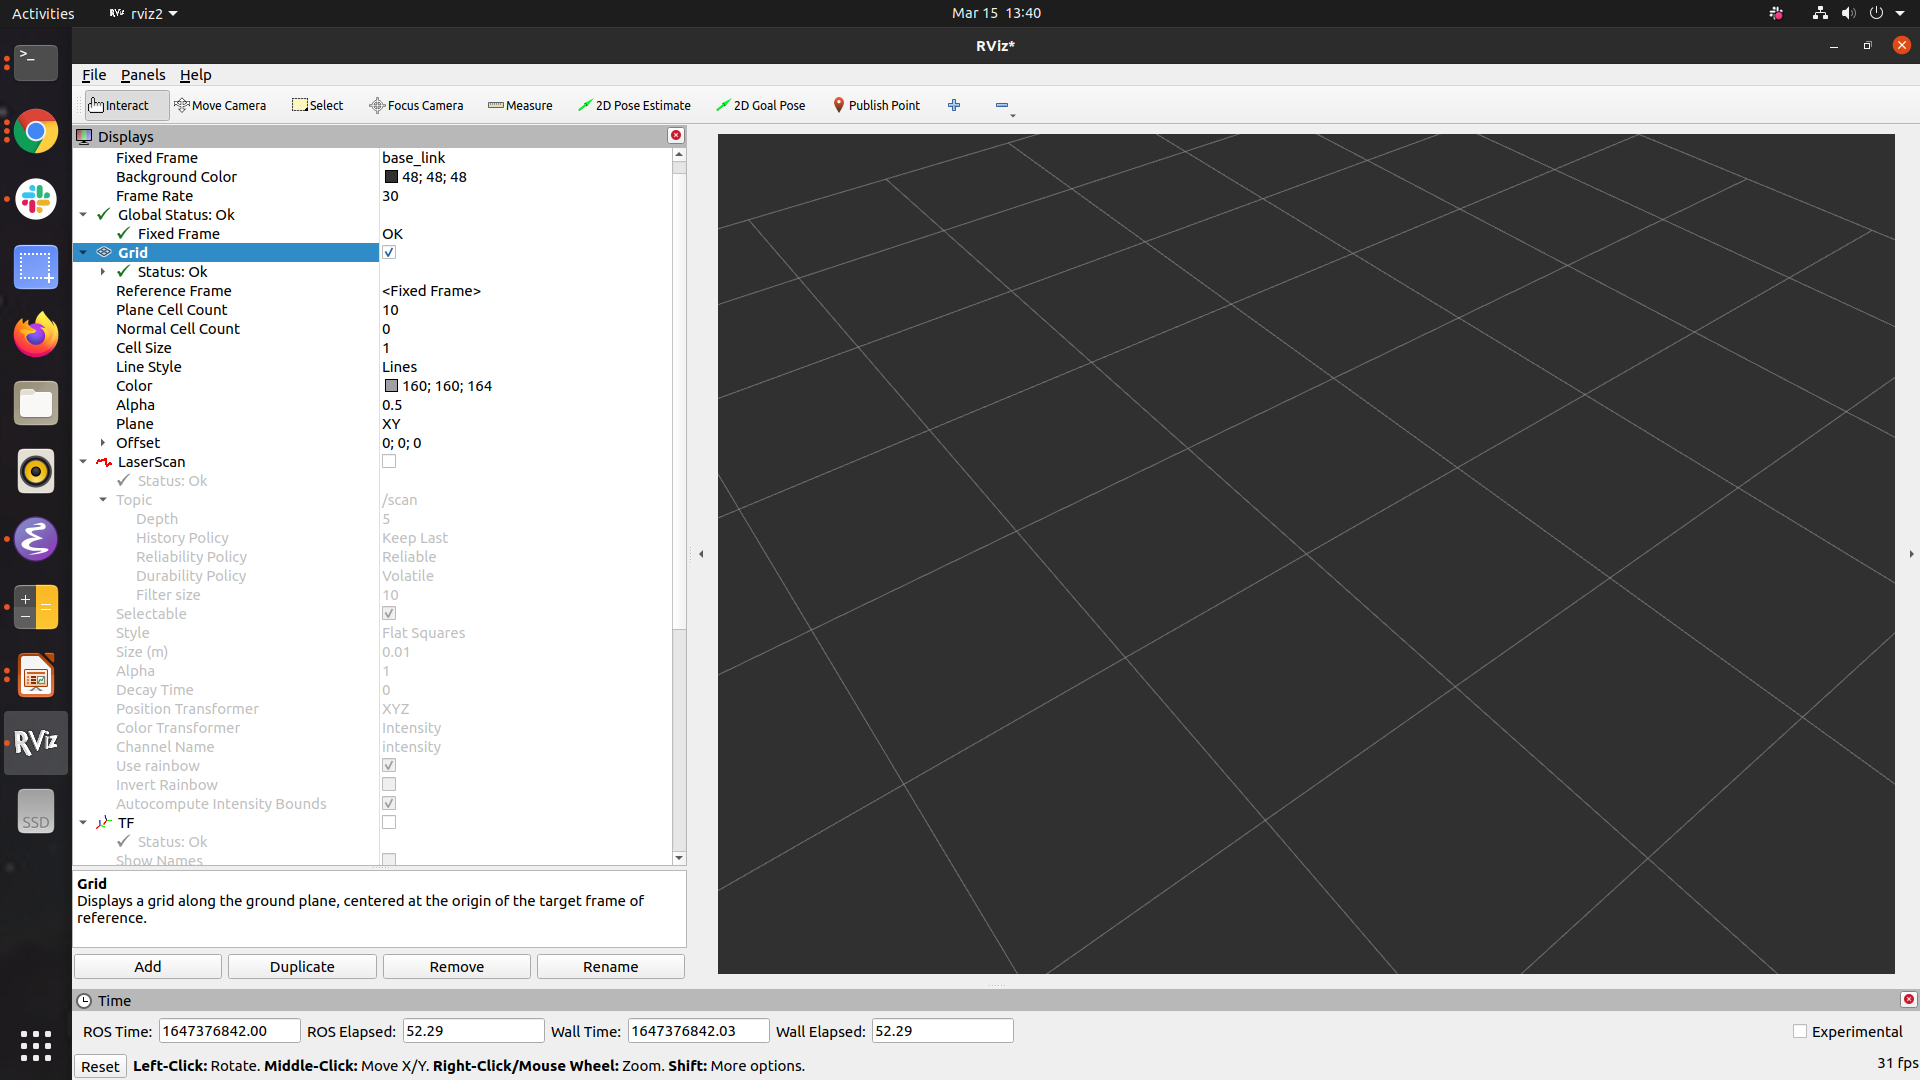
rviz2
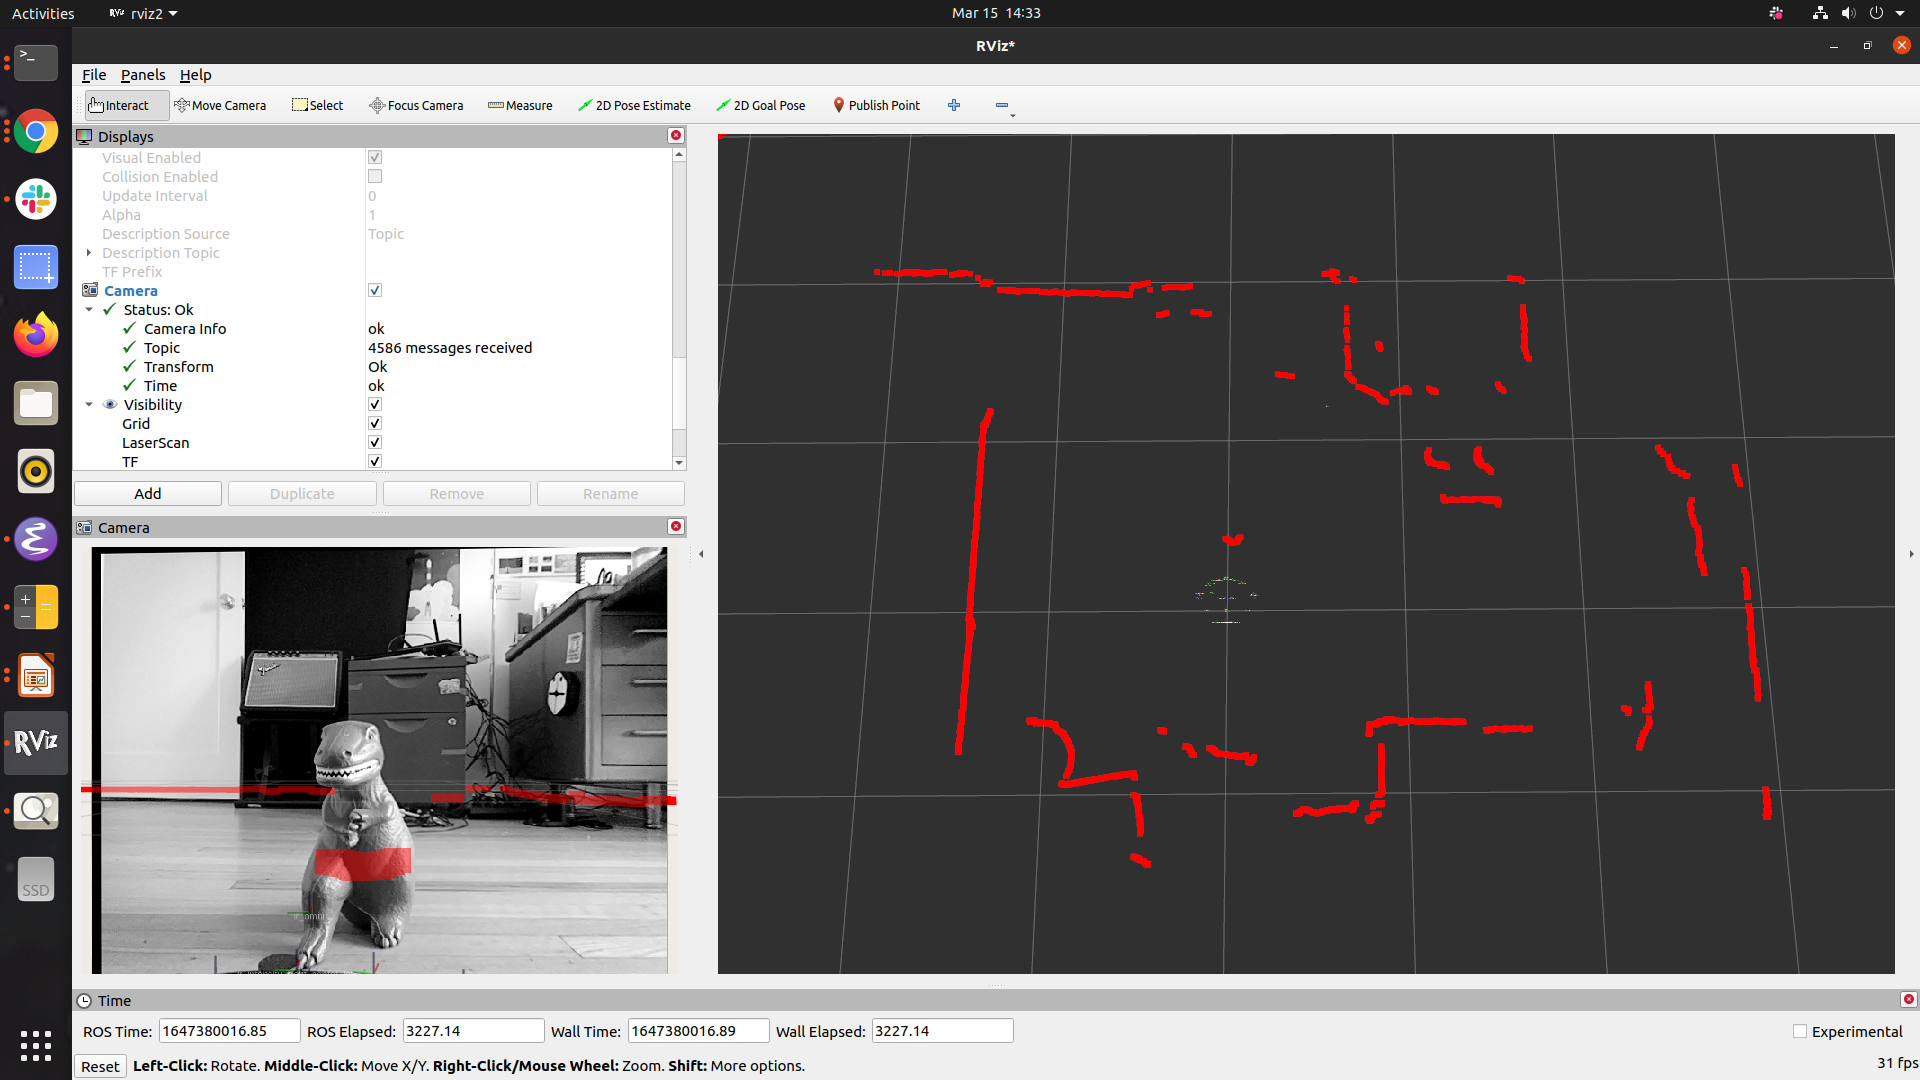
- You should see something like the image above.
- RViz is ROS's tool for visualizing everything about your robot.
- On the left of RVIZ you'll see a "Displays" pane that let's you configure what data you want to see.
- On the right you'll see visualization of your robot and the surrounding environment.
- RVIZ is highly configurable. You'll be able to see your robot, its sensors, and the data from the sensors.
- The view panes in RVIZ are configurable, and you can customize it quickly to suit your needs.
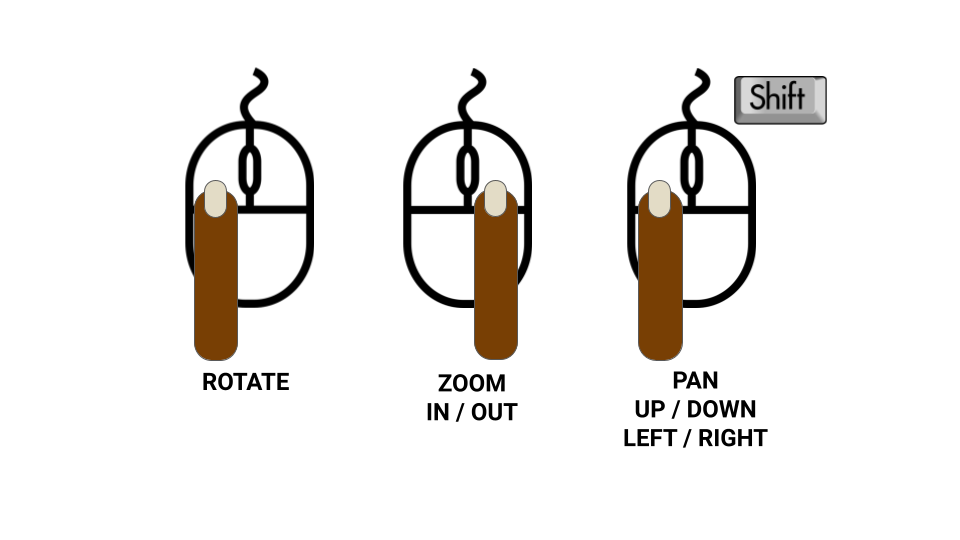
- The control of visualization is a different than Ignition.
- Left mouse button rotates the view.
- Right mouse button zooms the view.
- Shift + left mouse pans the view.
- Now we'll setup RVIZ for teleoperation (remote driving).
- The first step is to set our reference frame, this will tell RVIZ how to display our data.
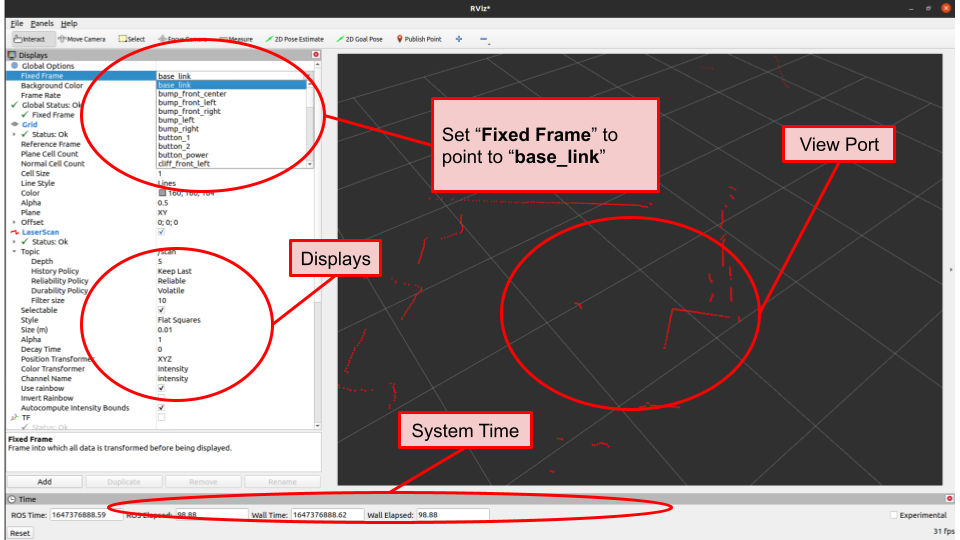
- On the left hand side of RViz you should see a "Displays" pane.
- Towards the top there should be a value that says "Fixed Frame" with a drop down to the right of it (see diagram).
- Set the fixed frame to
base_link. - In ROS,
base_linkmeans the "base" of the robot. For wheeled robots it is usually in the center - This value needs to be set to see anything else in RVIZ.
- Next we're going to enable TF, which is ROS shorthand for "transform."
- A transform is a simply a position on a robot relative to another position.
- For example, one transform might be the position of the robot's camera with respect to its left wheel.
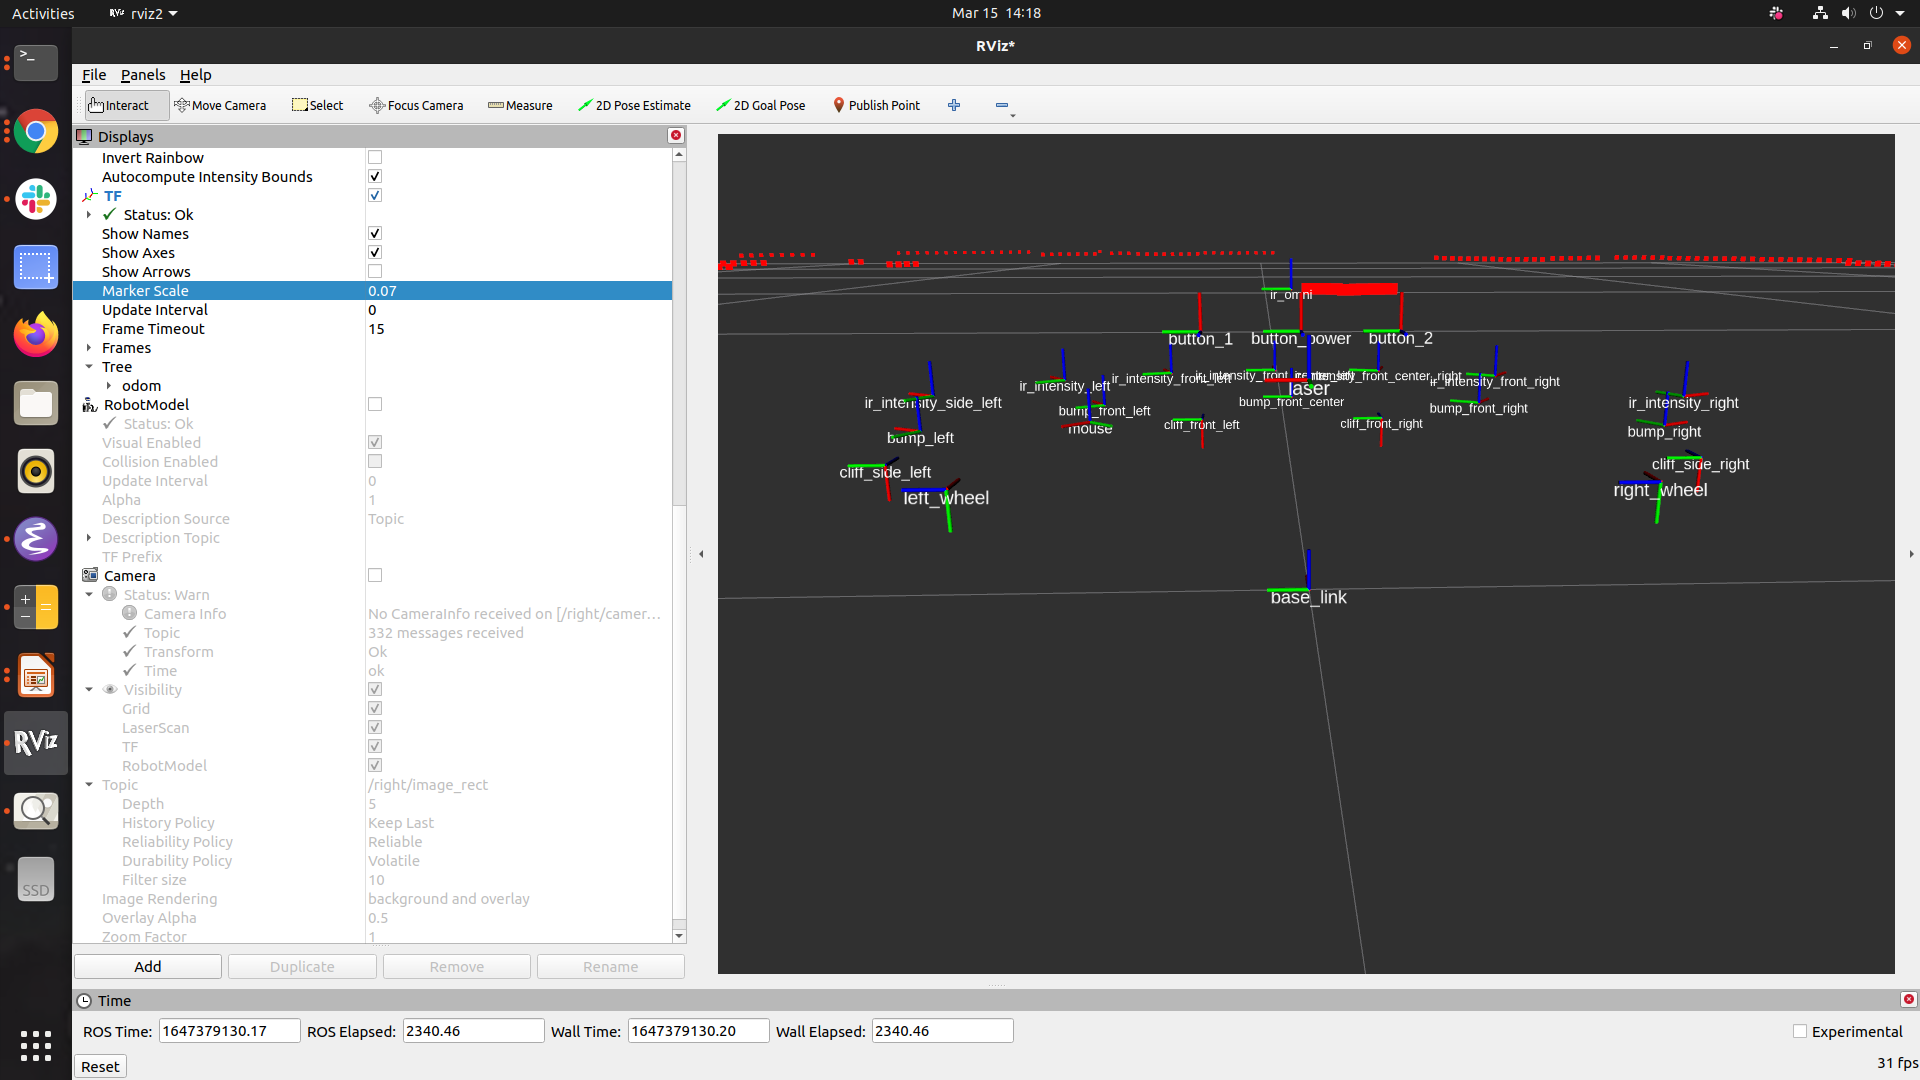
- To see the "base_link" in RVIZ find the
TFsection of the display pane and do the following:- Set the check box for
TF - Set the check box for
Show Names. - Set the check box for
Show Axes. - Shrink the "Marker Scale," the size of the TF names, to be about 0.07
- Set the check box for
- You should see something like the image above.
- Next we'll setup the TB4 camera and lidar.
- To view the LIDAR click
Addin the display pane.- In the dialog that pops up select
LaserScan. - Under
LaserScanin the Displays pane click the checkbox to enable the dispaly. - Set the
Topicto/scan - The laser scan should now be visible.
- In the dialog that pops up select
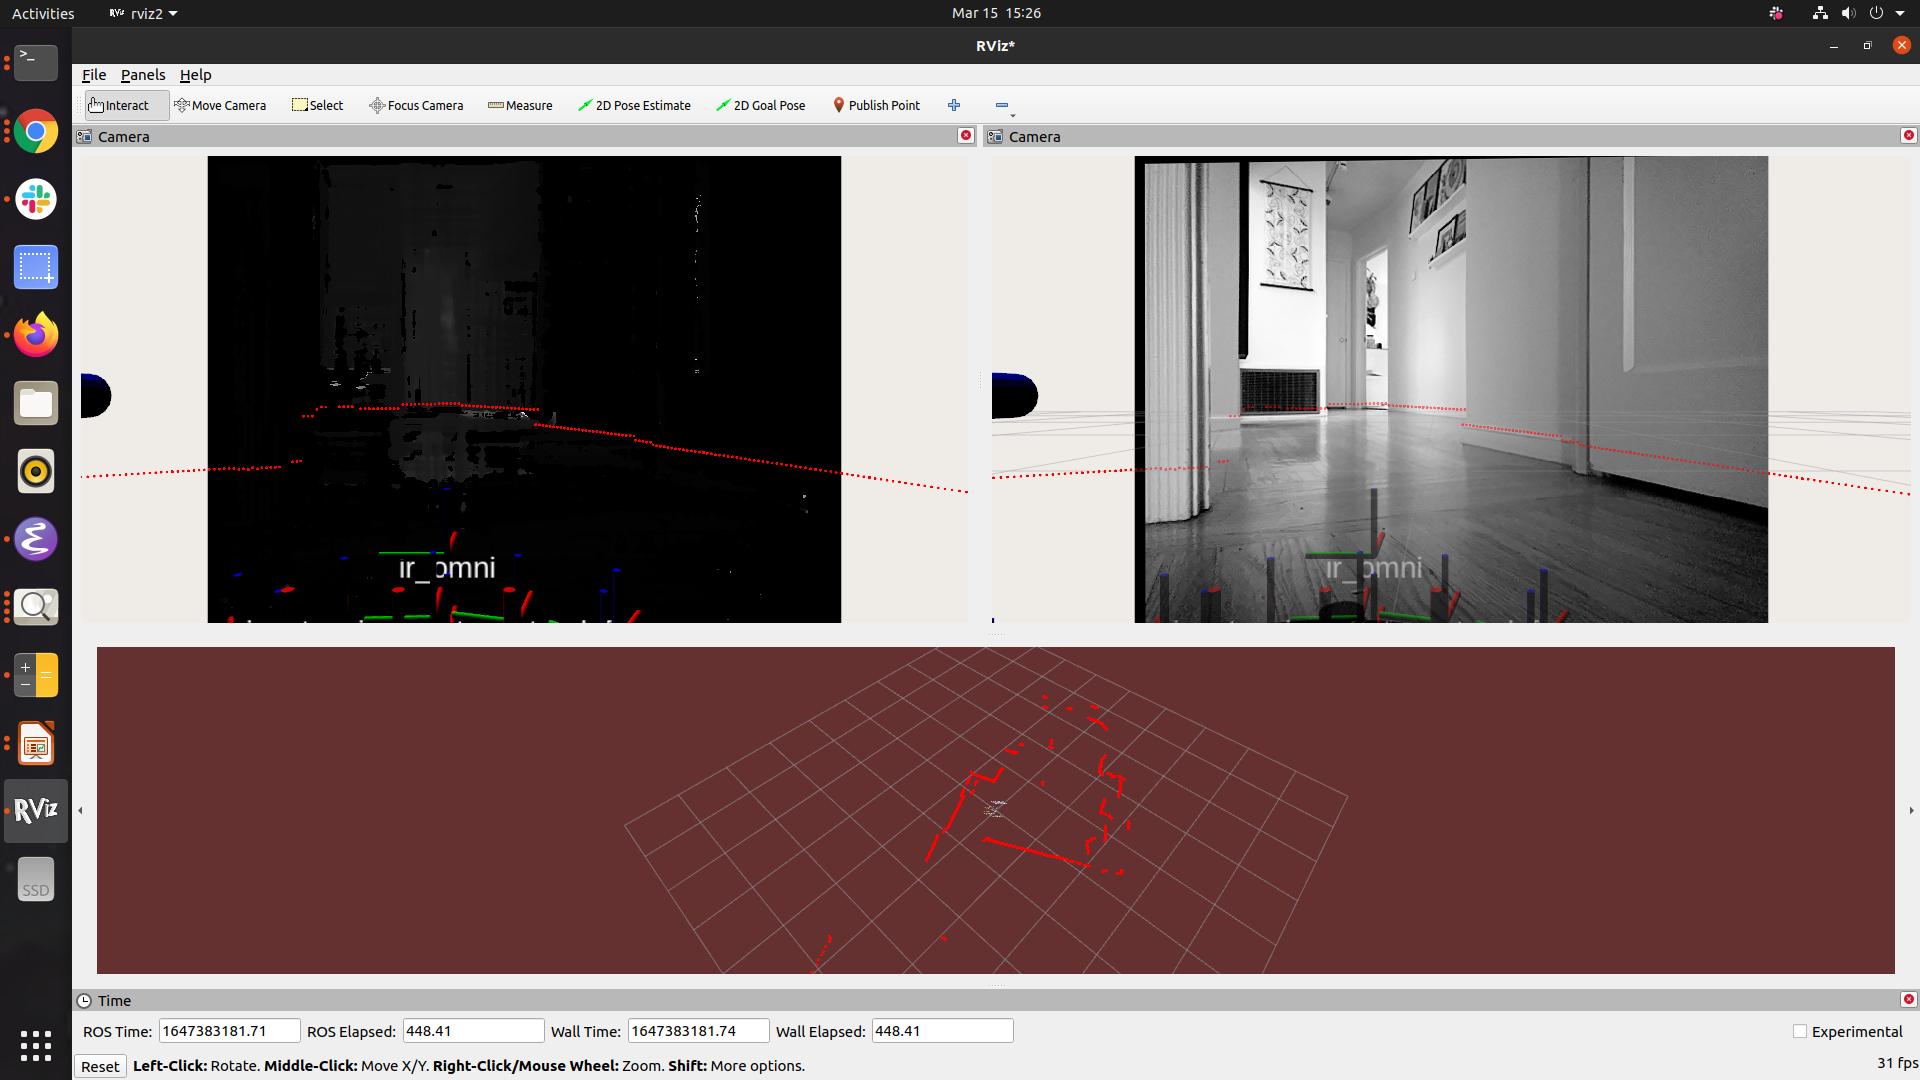
- To the view the camera click the
Addbutton under displays.- In the dialog that pops up select
Camera - Now enable the camera by clicking the checkbox in the Displays pane.
- Set
Topicto either/right/image_rector/left/image_rect/
- In the dialog that pops up select
- RViz is highly configurable. You can save and load various configurations to suit your application.
- We've barely scratched the surface of what RVIZ can do, but it is good to get familiar with it.
- A full list of features can be found in the RVIZ documentation.
- Take your robot for a spin and try different configurations!