-
Main Thread에서 User Interface의 모든 코드를 실행한다. Data transform이나 image processing과 같은 작업을 main thread에서 진행하면, User Interface는 느려지거나 중지된다.
-
Concurrency를 이용하자. thread를 이용한다. 하지만, 코드의 불변성 유지가 어렵다. GCD 라는 Concurrency Library를 사용


-
The term thread is used to refer to a separate path of execution or code. 코드 실행을 위한 별도의 실행 경로
-
The term process is used to refer to a running executable, which can encompass multiple threads. 여러 thread를 포함할 수 있는, 실행 파일(running executable)
-
The term task is used to refer to the abstract concept of work that needs to be performed. 수행해야할 작업의 추상적 개념
-
Parallelism vs Concurrency

-
-
특징
- C 기반의 메커니즘
- Dispatch Queue excuse FIFO
- thraed - safe 하다.
-
Queue 종류
-
Serial Dispatch Queue
- 한번에 하나의 작업만 실행하며 해당 task가 완료될 때 까지 기다린 후, 새 task를 시작합니다.
let serialQueue = DispatchQueue(label: "com.example.serial")
let serialQueue = DispatchQueue(label: "com.example.serial")
serialQueue.async {
    for i in 0..<10 {
        print("🍏", i)
    }
}
serialQueue.async {
    for i in 100..<110 {
        print("🍎", i)
    }
}
🍏 0
🍏 1
🍏 2
🍏 3
🍏 4
🍏 5
🍏 6
🍏 7
🍏 8
🍏 9
🍎 100
🍎 101
🍎 102
🍎 103
🍎 104
🍎 105
🍎 106
🍎 107
🍎 108
🍎 109
-
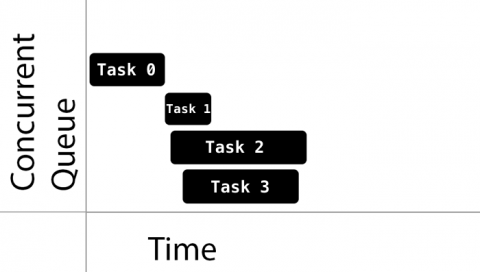
Concurrent Dispatch Queue
- 이미 시작된 작업이 완료될 때 까지 기다리지 않고, 가능한 많은 작업을 시작합니다.
- 추가된 순서대로 시작되도록 보장된다. (FIFO)
let conCurrentQueue = DispatchQueue(label: "com.example.concurrent", attributes: .concurrent)
let conCurrentQueue = DispatchQueue(label: "com.example.concurrent", attributes: .concurrent)
conCurrentQueue.async {
    for i in 0..<10 {
        print("🍏", i)
    }
}
conCurrentQueue.async {
    for i in 100..<110 {
        print("🍎", i)
    }
}
🍏 0
🍎 100
🍏 1
🍎 101
🍏 2
🍎 102
🍏 3
🍎 103
🍏 4
🍎 104
🍏 5
🍎 105
🍏 6
🍎 106
🍏 7
🍎 107
🍏 8
🍎 108
🍏 9
🍎 109
-
-
주요 타입
- Main Queue : Serial Queue, Main thread에서 실행, 모든 UI 처리, 높은 우선 순위를 갖고 있다.
- Global queue : Concurrent Queue, 전체 시스템에서 공유한다.
- Custom Queue : Serial or Concurrent Queue. Global Queue 중 하나에 의하여 처리된다.
-
Submit Work (Asyncronous, Syncronous)
-
Syncronous
let serialQueue = DispatchQueue(label: "com.example.serial")
serialQueue.sync {
    for i in 0..<10 {
        print("🍏", i)
    }
}
for i in 100..<110 {
    print("🍎", i)
}
🍏 0
🍏 1
🍏 2
🍏 3
🍏 4
🍏 5
🍏 6
🍏 7
🍏 8
🍏 9
🍎 100
🍎 101
🍎 102
🍎 103
🍎 104
🍎 105
🍎 106
🍎 107
🍎 108
🍎 109
-
subsystem들을 직렬화로 처리한다.
-
안전하게 property에 접근할 수 있다. (mutual exclusion) ex) mutex, semaphore
하지만, Deadlock이 발생할 수도 있다.
class MyObject {
	private let internalState: Int
	private let internalQueue: DispatchQueue
	var state: Int {
		get {
			return internalQueue.sync { internalState }
		}
		set (newState) {
			internalQueue.sync { internalState = newState }
		}
	}
}
-
-
Asyncronous
serialQueue.async {
    for i in 0..<10 {
        print("🍏", i)
    }
}
for i in 100..<110 {
    print("🍎", i)
}
🍎 100
🍏 0
🍎 101
🍏 1
🍎 102
🍏 2
🍎 103
🍎 104
🍎 105
🍏 3
🍎 106
🍎 107
🍎 108
🍏 4
🍎 109
🍏 5
🍏 6
🍏 7
🍏 8
🍏 9
-
-
직접 우선순위를 지정하지 않고,
DispatchQoS.QoSClass로 지정합니다.let globalQueue = DispatchQueue.global(qos: DispatchQoS.QoSClass.userInteractive)
-
.userInteractive: UI 업데이트, 이벤트 처리 및 대기 시간이 적은 작업. Main Thread에서 실행되어야 한다. -
.userInitiated: 사용자가 즉각적인 결과를 기다리고 있고 UI 상호 작용을 계속하는 데 필요한 작업에 사용.mapped into the high priority global queue.
-
.default -
.utility: 계산, I/O, 네트워킹, 연속적인 데이터 피드 등 지속적인 작업이 필요한 경우에 사용 mapped into the low priority global queue. -
.background: 시간에 민감하지 않은 작업들 mapped into the background priority global queue -
.unspecifiedlet serialQueue1 = DispatchQueue(label: "com.example.serial1", qos: .userInteractive) let serialQueue2 = DispatchQueue(label: "com.example.serial2", qos: .userInteractive) serialQueue1.async { for i in 0..<10 { print("🍏", i) } } serialQueue2.async { for i in 100..<110 { print("🍎", i) } } 🍎 100 🍏 0 🍎 101 🍏 1 🍎 102 🍏 2 🍎 103 🍏 3 🍎 104 🍏 4 🍎 105 🍏 5 🍎 106 🍏 6 🍎 107 🍏 7 🍎 108 🍏 8 🍎 109 🍏 9
let serialQueue1 = DispatchQueue(label: "com.example.serial1", qos: .background)
let serialQueue2 = DispatchQueue(label: "com.example.serial2", qos: .userInteractive)
serialQueue1.async {
    for i in 0..<10 {
        print("🍏", i)
    }
}
serialQueue2.async {
    for i in 100..<110 {
        print("🍎", i)
    }
}
🍏 0
🍎 100
🍎 101
🍎 102
🍎 103
🍎 104
🍎 105
🍎 106
🍏 1
🍎 107
🍏 2
🍎 108
🍎 109
🍏 3
🍏 4
🍏 5
🍏 6
🍏 7
🍏 8
🍏 9
-
-
DispatchWorkItem : DispatchQueue에 제출하는 작업을 캡슐화한 것
let workItem = DispatchWorkItem {
    print("Dipsatch Work Item")
}
//workItem.perfomr()
//serialQueue1.async(execute: item)
-
-
Structuring Your Application
- Data flow 식별
- Subsystem으로 나눈다.
- 각 Subsystem에 Dispatch Queue를 부여한다. 너무 많은 queue와 thread는 성능 저하의 주범이다.
-
Grouping, Chaing
-
Chaining
-
다른 Dispatch Queue에서 transform 등을 처리한 후, data만 다시 main thread로 보낸다.
let queue = DispatchQueue(label: "com.example.imageTransform")

queue.async {
    let smallImage = image.resize(to: rect)
    //DispatchQueue.main : Main Thread에서 실행하는 모든 항목 처리
    DispatchQueue.main.async {
        imageView.image = smallImage
    }
}
-
-
-
Grouping
-
group.notify(queue: DispatchQueue.main){}: group에서의 작업이 완료되면, 선택한 queue에서 작업을 완료하도록 지시한다.let group = DispatchGroup() let serialQueue1 = DispatchQueue(label: "com.example.serial1") let serialQueue2 = DispatchQueue(label: "com.example.serial2") serialQueue1.async(group: group) { print("serialQueue1") } serialQueue1.async(group: group) { print("serialQueue2") } group.notify(queue: DispatchQueue.main) { print("group notify") }
-
-
-
Dispatch Delay
print(Date())
serialQueue1.asyncAfter(deadline: .now() + .seconds(2)) {
    print("Dispatch asyncAfter", Date())
}
-


-
-
특징
-
Operation Queue에 넣기 위한 thread-safe 추상 클래스
-
KVO 알림을 생성한다.
var tokens: [NSKeyValueObservation] = []
let operation1 = MyOperation(index: 0)
tokens.append(operation1.observe(\.ready) { (operation, value) in
	print("operation1 - ready")
})
tokens.append(operation1.observe(\.executing) { (operation, value) in
	print("operation1 - executing")
})
tokens.append(operation1.observe(\.finished) { (operation, value) in
	print("operation1 - finished")
})
tokens.append(operation1.observe(\.cancelled) { (operation, value) in
	print("operation1 - cancelled")
})
-
.start()를 직접적으로 호출하는것보다는 OperationQueue에 추가하여 사용하는것이 바람직합니다.
-
class MyOperation: Operation {
    var index: Int?
    override func main() {
        print("From My Operation \(self.index)")
    }
    init(index: Int) {
        super.init()
        self.index = index
    }
}
-
LifeCycle
-
pending : Queue에 추가될 때
-
pending에서 조건이 충족되면 ready 상태로 변하며, 열린 슬롯이 있다면, executing으로 변한다.
-
모든 작업을 완료하면 finished 상태가되어 OperationQueue에서 제거
-
NSOperationQueue는 finished 값이 true로 바뀌어야만 Dequeue됩니다. 그렇지 않다면, Deadlock을 야기할 소지가 있습니다.
-
Finished 상태로 들어가면, completion block 을 실행합니다.
operation1.completionBlock = {
            print("operation1 - completion block")
}
true false ready 작업이 실행될 준비가 되었음 작업의 초기화가 아직 끝나지 않음 executing 해당 작업이 현재 작업 중 그 외의 상황 finished 작업이 성공적으로 종료되었거나 취소가 되었음 -
-
-
특징
-
Queue에 작업을 쌓아두고, 병렬적으로 처리하기 위한 클래스입니다.
-
Operation queues는 항상 Operation을 병렬적으로 실행하지만, Dependency를 이용하여 필요할 때 순차적으로 실행되도록 할 수 있습니다.
-
동시에 진행할 수 있는 최대 작업 수를 결정할 수 있다.
let operationQueue = OperationQueue()
operationQueue.maxConcurrentOperationCount = 5
class MyWork {
    let operationQueue = OperationQueue()
    init() {
        operationQueue.addOperation(MyOperation(index: 0))
        operationQueue.addOperation(MyOperation(index: 1))
        operationQueue.addOperation(MyOperation(index: 2))
        operationQueue.addOperation(MyOperation(index: 3))
        operationQueue.addOperation(MyOperation(index: 4))
    }
}
-
-
-
다른 작업을 먼저 실행해야 자신을 실행할 수 있다고 명시하는 작업을 만들 수 있습니다
operation2.addDependency(operation1) //execute operation1 before operation2
-

https://developer.apple.com/videos/play/wwdc2016/720/
https://www.appcoda.com/grand-central-dispatch/
https://www.raywenderlich.com/148513/grand-central-dispatch-tutorial-swift-3-part-1
https://medium.com/flawless-app-stories/parallel-programming-with-swift-operations-54cbefaf3cb0