SQL Server Configuration
Describes the configuration of SQL Server for ThreadFix.
To manage your SQL Server database, we recommend that you install the following application:
- SQL Server Management Studio (SSMS) available [here] (http://msdn.microsoft.com/en-us/library/mt238290.aspx)
Once you have it installed, you can connect to a SQL Server database using the instructions in the next section.
These instructions refer to the latest release of SSMS.
Open SSMS and in the Connect to Server dialog window (if this window does not open automatically, then go to File -> Connect Object Explorer) enter the details for your SQL Server database. You will need the Server name or ip address, and login and password. Below is a sample connection settings for SSMS:
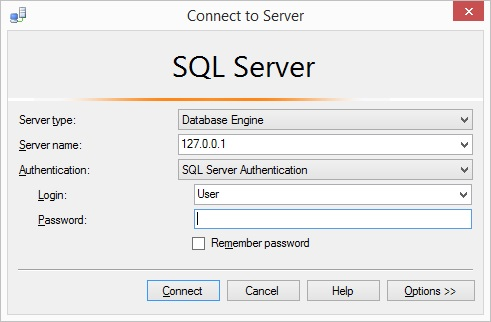
Server type is set to Database Engine, Server Name is the IP address or host name of your SQL Server database, Authentication is set to SQL Server Authentication, then enter the Login and Password for your SQL Server. Finally click on Connect and you should see your Database in the Object Explorer in SSMS.
If you do not already have a threadfix database in your SQL Server, then you will need to create one prior to starting the ThreadFix application. You can do this from SSMS once you are connected to the server. Follow the next steps in case you need to create the threadfix database.
- From SSMS, in the Object Explorer, right click on the
Databasesfolder and click onNew Database. - Enter the name of the database
threadfixand click OK. - Create a username in the database for the ThreadFix application and grant full privileges to this user.
Go the threadfix\WEB-INF\classes\ folder of Tomcat (where the application was installed), and edit the file jdbc.properties. To use a SQL Server connection, comment all existing connections (use # in front of each line) and use the following settings to connect to your SQL Server:
jdbc.driverClassName=net.sourceforge.jtds.jdbc.Driver
jdbc.url=jdbc:jtds:sqlserver://127.0.0.1:1433/threadfix;integratedSecurity=false
jdbc.username=user
jdbc.password=
hibernate.dialect=org.hibernate.dialect.SqlServer2012Dialect
hibernate.hbm2ddl.auto=update

hibernate.globally_quoted_identifiers=true

# For debugging
hibernate.show_sql=false
In the above settings, replace 127.0.0.1 with the address or host name of your SQL Server, and enter the user and password for the threadfix database user in the jdbc.username and jdbc.password fields respectively.
Now, save the settings and restart your web server. After it finishes restarting, ThreadFix will have the new settings and it will be connected to your SQL Server database.