.. questions::

   - How to organize Python projects larger than one script?
   - What is a good file and folder structure for Python projects?
   - How can you make your Python functions most usable by your collaborators?
   - How to prepare your code to make a Python package?
   - How to publish your Python package?
.. objectives::

   - Learn to identify the components of a Python package
   - Learn to create a Python package
   - Learn to publish a Python package
Python projects often start as a single script or Jupyter notebook but they can grow out of a single file.
In the :ref:`scripts` episode we have also learned how to import functions and objects from other Python files (modules). Now we will take it a step further.
Recommendations:
- Collect related functions into modules (files).
- Collect related modules into packages (we will show how).
- Add a
LICENSEfile to your code from choosealicense.com (see Software Licensing and Open source explained with cakes). - Write a
README.mdfile describing what the code does and how to use it. - It is also recommended to document your package.
- When the project grows, you might need automated testing.
To have a concrete but still simple example, we will create a project
consisting of 3 functions, each in its own file. We can then imagine that each
file would contain many more functions. To make it more interesting,
one of these functions will depend on an external library: scipy.
These are the 3 files:
.. literalinclude:: packaging-example-project/calculator/adding.py
   :caption: adding.py
.. literalinclude:: packaging-example-project/calculator/subtracting.py
   :caption: subtracting.py
.. literalinclude:: packaging-example-project/calculator/integrating.py
   :caption: integrating.py
We will add a fourth file:
.. literalinclude:: packaging-example-project/calculator/__init__.py
   :caption: __init__.py
This __init__.py file will be the interface of our package/library.
It also holds the package docstring and the version string.
Note how it imports functions from the various modules using relative imports
(with the dot).
This is how we will arrange the files in the project folder/repository:
project-folder
├── calculator
│   ├── adding.py
│   ├── __init__.py
│   ├── integrating.py
│   └── subtracting.py
├── LICENSE
└── README.md
Now we are ready to test the package. For this we need to be in the "root"
folder, what we have called the project-folder. We also need to have
scipy available in our environment:
.. literalinclude:: packaging-example-project/test.py
The package is not yet pip-installable, though. We will make this possible in the next section.
To make our example package pip-installable we need to add one more file:
project-folder
├── calculator
│   ├── adding.py
│   ├── __init__.py
│   ├── integrating.py
│   └── subtracting.py
├── LICENSE
├── README.md
└── pyproject.toml
This is how pyproject.toml looks:
.. literalinclude:: packaging-example-project/pyproject.toml
   :caption: pyproject.toml
   :emphasize-lines: 13-15
Note how our package requires scipy and we decided to not pin the version
here (see :ref:`version_pinning`).
Now we have all the building blocks to test a local pip install. This is a good test before trying to upload a package to PyPI or test-PyPI (see :ref:`pypi`)
Note
Sometime you need to rely on unreleased, development versions as
dependencies and this is also possible. For example, to use the
latest xarray you could add:
dependencies = [
     "scipy",
     "xarray @ https://github.com/pydata/xarray/archive/main.zip"
]
.. seealso::
- `pip requirement specifiers <https://pip.pypa.io/en/stable/reference/requirement-specifiers/>`__
- pyOpenSci tutorial on
`pyproject.toml metadata <https://www.pyopensci.org/python-package-guide/tutorials/pyproject-toml.html>`__.. challenge:: Packaging-1
To test a local pip install:
- Create a new folder outside of our example project
- Create a new virtual environment and activate it (more on this in :ref:`dependency_management`)
.. hint:: To create and activate a virtual environment
:class: dropdown
.. tabs::
.. tab:: Unix/macOS
.. code-block:: bash
python -m venv .venv
source .venv/bin/activate
which python
.. tab:: Windows
.. code-block:: bat
python -m venv .venv
.venv\Scripts\activate
where python
- Install the example package from the project folder
into the new environment::
pip install --editable /path/to/project-folder/
- Test the local installation:
.. literalinclude:: packaging-example-project/test.py
- Make a change in the ``subtract`` function above such that it always
returns a float ``return float(x - y)``.
- Open a new Python console and test the following lines. Compare it with
the previous output.
.. literalinclude:: packaging-example-project/test_editable.py
.. demo::

   Most people will watch and observe this, due to the speed with which we will
   move.
Once we are able to pip-install the example package locally, we are ready for upload.
We exercise by uploading to test-PyPI, not the real PyPI, so that if we mess things up, nothing bad happens.
We need two more things:
Let's try it out. First we create the distribution package:
$ python3 -m buildWe need twine:
$ pip install twineAnd use twine to upload the distribution files to test-PyPI:
$ twine upload -r testpypi dist/*

Uploading distributions to https://test.pypi.org/legacy/
Enter your API token:
Note
To generate an API token, proceed to the Create API token page in test-PyPI. You will be prompted for your password.
.. solution:: The long-version for finding the *Create API token* page

   1. Log on to test-PyPI_ at https://test.pypi.org
   2. In the top-right corner, click on the drop-down menu and click **Account settings** or
      follow this `link <https://test.pypi.org/manage/account/#api-tokens>`__.
   3. Scroll down to the section **API tokens** and click the button **Add API token**,
      which opens up the
      `Create API token`_ page.
- Under Token name write something memorable. It should remind you the purpose or the name of the computer, such that when you are done using it, you can safely delete it.
- Under Scope select
Entire account (all projects). - Click on Create token.
- Click on Copy token once a long string which starts
with
pypi-is generated.
Paste that token back into the terminal where twine upload ... is running and press ENTER.
Once this is done, create yet another virtual environment and try to install from test-PyPI (adapt myname).
.. tabs::

   .. tab:: Linux / macOS

      .. code-block:: console
         :emphasize-lines: 4-7

          $ python3 -m venv venv-calculator
          $ source venv-calculator/bin/activate
          $ which python
          $ python3 -m pip install \
              -i https://test.pypi.org/simple/ \
              --extra-index-url https://pypi.org/simple/ \
              calculator-myname
          $ deactivate

   .. tab:: Windows

      .. code-block:: console
         :emphasize-lines: 4

          $ python3 -m venv venv-calculator
          $ venv-calculator\Scripts\activate
          $ where python
          $ python3 -m pip install -i https://test.pypi.org/simple/ --extra-index-url https://pypi.org/simple/ calculator-myname
          $ deactivate
If you upload packages to PyPI or test PyPI often you can create an API token and save it in the .pypirc file.
The solution that we have used to create the example package (using
setuptools and twine) is not the only approach. There are many ways to
achieve this and we avoided going into too many details and comparisons to not
confuse too much. If you web-search this, you will also see that recently the
trend goes towards using pyproject.toml as more general
alternative to the previous setup.py.
There are at least five tools which try to make the packaging and PyPI interaction easier:
Today, due to standards such as pyproject.toml and pylock.toml, to specify the
package metadata and dependency lock file respectively, the above are largely
cross-compatible amongst each other and with pip.
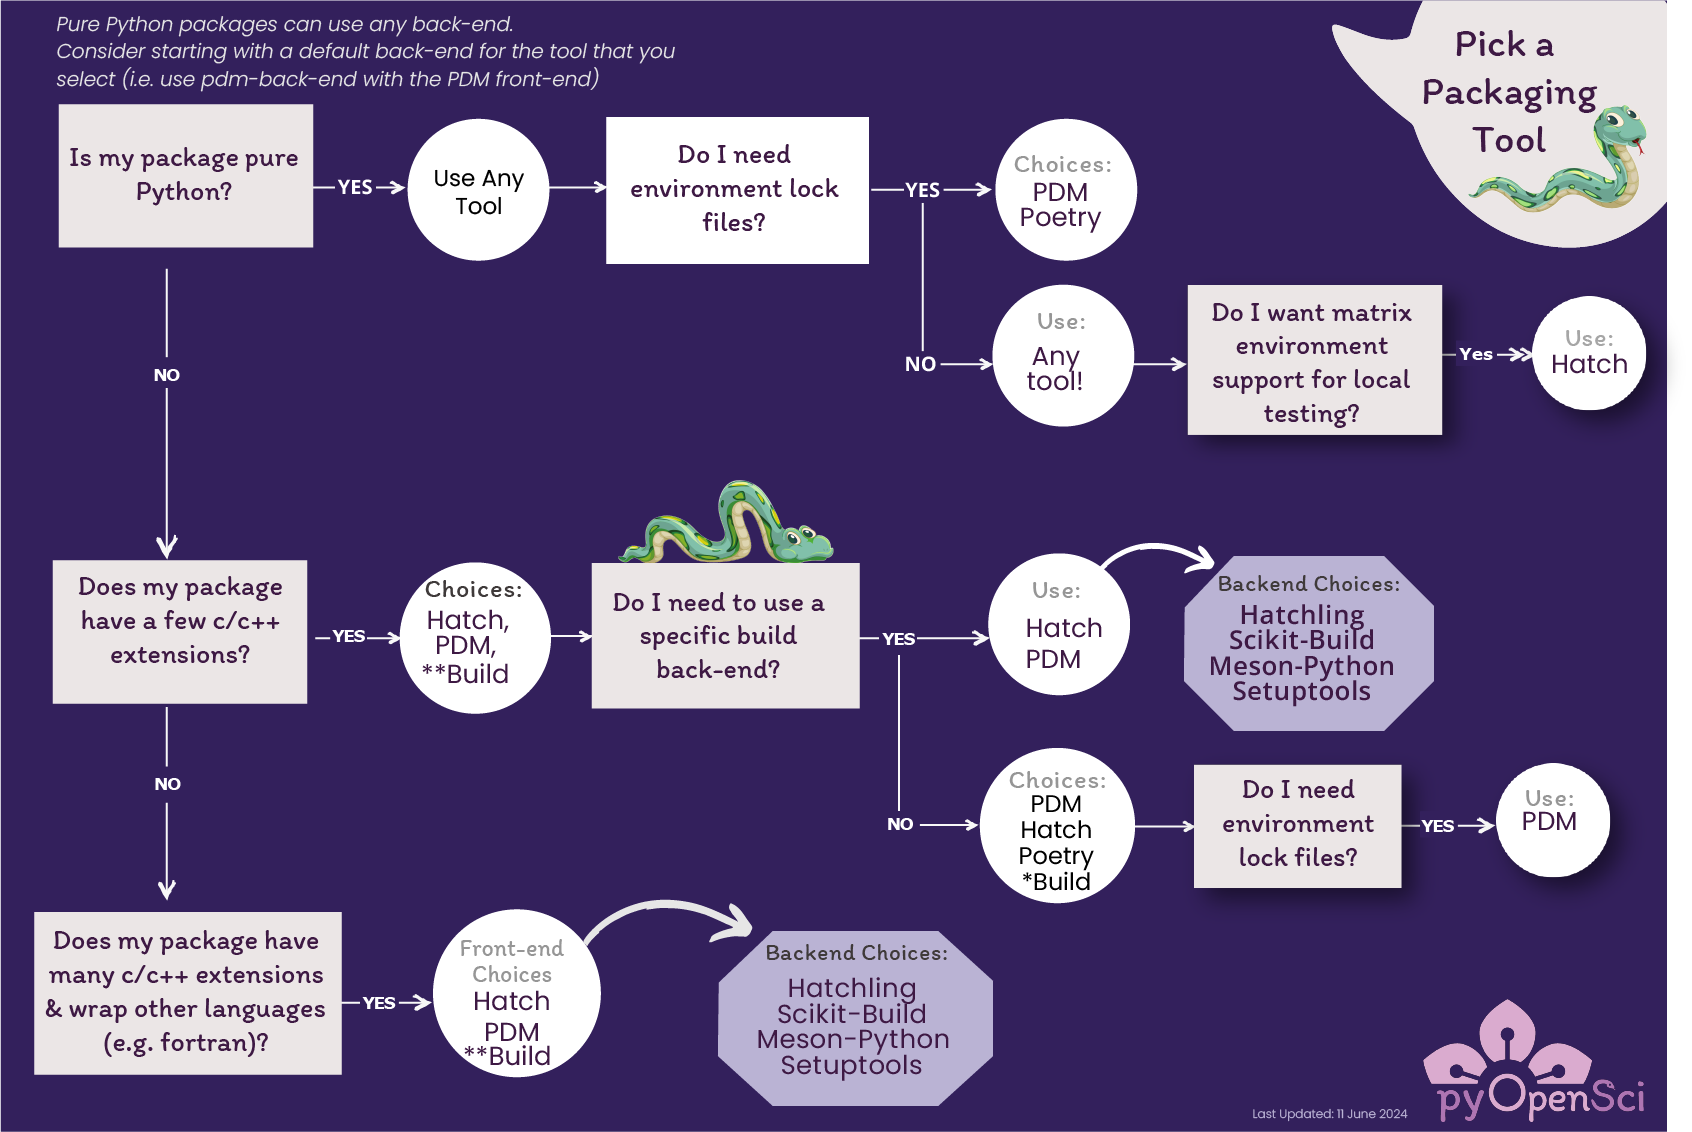
Credits: pyOpenSci's Python Package Guide licensed CC-BY-SA 4.0
.. callout:: Prerequisites

  To generate a conda build recipe, the package ``grayskull`` and
  to build it, the package ``conda-build`` are required.
  You may install these with **Anaconda Navigator** or from the command line::

    $ conda install -n base grayskull conda-build
The simplest way for creating a conda package for your python script is to first publish it in PyPI following the steps explained above.
Once build, the conda package can be installed locally. For this example, we will use runtest. runtest is a numerically tolerant end-to-end test library for research software.
Generate the recipe by executing (
grayskullorconda grayskull):$ conda grayskull pypi runtestThe command above will create a new folder called runtest containing a file meta.yaml, the conda recipe for building the runtest package.
View the contents of meta.yaml and ensure requirements :
requirements:
  host:
    - python
    - flit-core >=2,<4
    - pip
  run:
    - python
In the requirements above, we specified what is required for the host and for running the package.
.. callout:: Remark

   For pure python recipes, this is all you need for building a python package with conda.
   If your package needs to be built (for instance compilation), you would need additional files e.g. `build.sh` (to build on Linux/Mac-OSX) and `bld.bat` (to build on Windows systems). You can also add test scripts for testing your package. See `documentation <https://docs.conda.io/projects/conda-build/en/latest/user-guide/tutorials/build-pkgs.html#writing-the-build-script-files-build-sh-and-bld-bat>`__
Build your package with conda
Your package is now ready to be build with conda:
$ conda build runtest.. callout:: Conda package location Look at the messages produced while building. The location of the local conda package is given (search for `anaconda upload`): .. code-block:: none /home/username/miniforge3/conda-bld/noarch/runtest-2.3.4-py_0.tar.bz2 The prefix ``/home/username/miniforge3/`` may be different on your machine. depending on your operating system (Linux, Mac-OSX or Windows). The sub-folder is named ``noarch`` since it is a pure-python package and the recipe indicates the same. If package contained compiled code then the sub-folder would have been named ``win-64`` or ``linux-64``. It could then be converted to other platforms using `conda convert <https://docs.conda.io/projects/conda-build/en/latest/user-guide/tutorials/build-pkgs.html#converting-a-package-for-use-on-all-platforms>`__.
Check within new environment
It is not necessary to create a new conda environment to install it but as explained in previous episode, it is good practice to have isolated environments.
$ conda create -n local-runtest --use-local runtestWe can then check runtest has been successfully installed in local-runtest conda environment. Open a new Terminal with local-runtest environment (either from the command line:
$ conda activate local-runtestor via Anaconda Navigator (Open Terminal), import runtest and check its version:
import runtest
print(runtest.__version__)
.. callout:: Building a conda package from scratch

  It is possible to build a conda package from scratch without using conda grayskull.
  We recommend you to check the
  `conda-build documentation <https://docs.conda.io/projects/conda-build/en/latest/user-guide/tutorials/build-pkgs.html>`__
  for more information.
To be able to share and install your local conda package anywhere (on other platforms), you would need to upload it to a conda channel (see below).
- pixi is package management tool to cover all features of conda, along with ability to initialize and package new projects.
- rattler-build is a build tool which combines the functionalities of
conda grayskull,conda buildand allows you to also publish packages.
- Upload your package to conda-forge: conda-forge is a conda channel: it contains community-led collection of recipes, build infrastructure and distributions for the conda package manager. Anyone can publish conda packages to conda-forge if certain guidelines are respected.
- Upload your package to bioconda: bioconda is a very popular channel for the conda package manager specializing in bioinformatics software. As for conda-forge, you need to follow their guidelines when building conda recipes.
You can also create your own conda channel for publishing your packages.
.. keypoints::

   - It is worth it to organize your code for publishing, even if only
     you are using it.
   - PyPI is a place for Python packages
   - conda is similar but is not limited to Python